


3-14 Receiving & Installation MN2408
2. Verify that the transfer switch is in Utility Power mode. No power must be present at
the generator or transfer switch connections. Verify with a voltmeter.
3. Verify that the engine starting battery is disconnected so accidental starting is not
possible.
4. Verify that the generator is securely mounted and anchored to its cement pad.
5. Verify that proper clearance exists on all sides and top of enclosure.
6. Verify that generator power is properly connected to the transfer switch.
7. Verify that generator and transfer switch are properly grounded.
8. Assure that generator is a safe distance from any flammable or combustible material.
9. Verify that the generator and transfer switch load are voltage compatible.
10. Verify that no load is connected to the circuit breaker and/or transfer switch.
11. Inspect the engine and generator and verify that there are no loose wires or
components. Tighten if necessary.
12. Verify that the ground conductor is of correct wire size and properly connected.
13. Verify engine oil level is full. Refer to engine manual if necessary.
14. Verify engine coolant level is full. Refer to engine manual if necessary.
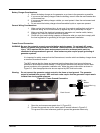
15. Verify exhaust system to assure it is in properly connected and pointing away from
combustible materials.
16. Verify that the Master Control Switch is still in the “Stop” position.
Connect the engine starting battery to the starter. Verify it is installed correctly.
17. Verify the fuel source is ON and the pressure and flow rate are correct.
18. Remove all tools, rags, etc. from inside the generator enclosure. Close all enclosure
doors and be sure no hands are inside the generator enclosure when it starts.
Post Installation Checks Continued
19. Verify all loads are disconnected.
20. Start the generator. (Refer to Section 4 Operation for details).
21. The engine should begin to crank and start when the fuel moves through the pipe to
the carburetor. If the engine fails to start, refer to Section 5 Troubleshooting.
22. With the engine running, several checks must be made:
a. Verify there are no fuel leaks. If a fuel leak is detected, stop the engine (move the
Master Control Switch to the “Stop” position) immediately and repair the leak
before proceeding.
b. Verify there are no coolant or oil leaks. If a leak is detected, stop the engine
(move the Master Control Switch to the “Stop” position) immediately and repair the
leak before proceeding.
c. Verify that operation is smooth. If belt squeals, vibrations or other sources of
noise exist, stop the engine (move the Master Control Switch to the “Stop”
position) immediately and repair before proceeding.
d. Verify that the correct voltage exists (line–to–line and line–to–neutral) at the
generator and at the transfer switch.
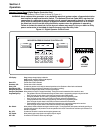
e. Minor adjustment of the output voltage is made using the “Voltage Adjust”
potentiometer on the control panel.
WARNING: Engine coolant is under pressure and is near the boiling point of water when engine is hot.
Do not open the coolant system until the engine has completely cooled. Hot coolant can
cause severe burns and other injuries. When engine is cool, coolant level can be checked.
23. After the operation checks are made, stop the engine (move the Master Control Switch
to the “Stop” position) and wait at least 2 hours for the engine to cool. When the
engine is cool, check engine oil and coolant levels as instructed in the engine operation
manual.
24. Close all enclosure covers. The post installation checks are now complete.