


MAINTENANCE
20
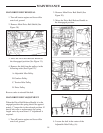
BEFORE EACH USE
1. Check tiller daily for loose, bent, broken,
or missing parts.
2. Observe tiller’s general condition, noting
points that may need attention.
3. Check rotor to be sure no foreign objects
such as wire or weeds are wrapped around
them.
4. Make certain drive line shields are in place
and in good condition.
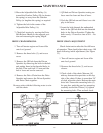
5. During operation, listen for abnormal
sounds which might indicate loose parts,
damaged bearings or other damage.
Correct any problem immediately.
AFTER EACH USE
1. Clean all debris from tiller especially on
the rotor.
2. To prevent rusting, touch up any spots
where paint may have worn off.
3. Store in a clean, dry place.
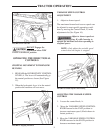
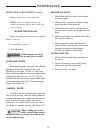
DRIVE CHAIN ADJUSTMENT (Cont’d)
4. Replace the access cover and bolts.
NOTE: Failure to adjust tension will
result in premature failure and could void
your warranty.
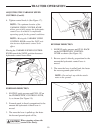
ROTOR TOOTH WEAR
Before performing maintenance as outlined
below be sure to:
1. Lower tiller to ground.
2. Turn off tractor.
If tiller must be raised off
the ground, block securely.
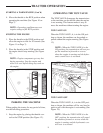
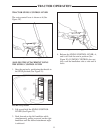
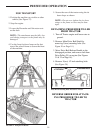
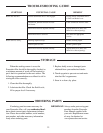
STANDARD TEETH
Rotor tooth length is critical to the efficient
operation of the tiller. Length of the tooth
should be no less than 1/2 inch. To keep your
tiller performing effectively, we recommend that
replacement teeth
(Part no. 200-337-002) be
welded onto the front of the original teeth when
tooth length approaches the 1/2 inch minimum
length. (See Figure 34.)
CARBIDE TEETH
Carbide teeth offer dramatically longer life.
Due to tooth spacing, and rotor tubing material,
carbide teeth cannot be welded onto an existing
rotor. A new rotor with carbide teeth can be
ordered for your tiller. Check with your author-
ized dealer for specific pricing. (See Figure 35.)
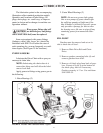
When welding rotor teeth,
welder ground clamp must be
attached to rotor to prevent current from flow-
ing through bearings.