


18
MAIN DRIVE BELT REMOVAL
1. Turn off tractor engine and lower tiller
onto level ground.
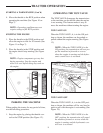
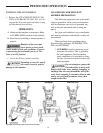
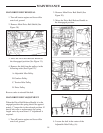
2. Remove Main Drive Belt Shield (See
Figure 30).
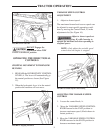
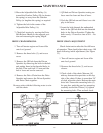
3. Move the Drive Belt Release Handle to
the disengaged position (See Figure 31).
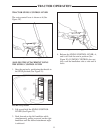
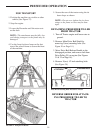
4. Remove the belt from the pulleys in the
following order (See Figure 32).
A. Adjustable Idler Pulley
B. Gearbox Pulley
C. Tension Idler Pulley
D. Drive Pulley
Reverse order to reinstall the belt.
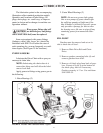
MAIN DRIVE BELT ADJUSTMENT
When the Drive Belt Release Handle is in the
engaged position the spring should be approxi-
mately 1" longer the in the released position. If
due to belt wear or replacement, the spring
length varies by more then 1/2" adjustment is
required.
1. Turn off tractor engine and lower tiller
onto level ground.
2. Remove Main Drive Belt Shield (See
Figure 30).
3. Move the Drive Belt Release Handle to
the disengaged position.
4. Loosen the bolt in the center of the
Adjustable Idler Pulley (A).
MAINTENANCE
FIGURE 30 Main Drive Belt Shield
FIGURE 32 Main Drive Belt Removal - Pulley Locations
FIGURE 31 Main Drive Belt Release Handle