GB - 24
Sealed Glass Mat Battery Removal
and Installation (Figure 19)
NOTE: If same size replacement battery is
not available a U1-size battery can be
installed (see Figure 21).
Remove
1. Disconnect negative (–) cable first, then
positive (+) cable.
2. Remove battery from unit.
Install
1. Install battery onto unit.
2. Connect positive (+) cable first, then
negative (–) cable.
3. Apply petroleum jelly or dielectric grease
to battery cable ends and terminals.
Replacing Sealed Glass Mat Battery
with U1-Size Battery (Figure 19 and
Figure 20)
1. Disconnect negative (–) cable first, then
positive (+) cable.
2. Disconnect fuel line at fuel filter.
3. Remove hardware securing battery
hold-down bracket to battery mount
bracket.
4. Remove battery from unit. Dispose of
properly.
5. Remove battery mat. Dispose of
properly.
6. Remove two nuts and bolts on both
sides of battery mount bracket (see
Figure 20).
Install U1-Size Battery (Figure 21)
NOTE: Battery hold-down bracket must be
moved to the rear position to allow the larger
U1 battery to fit.
1. Transfer battery mount bracket to new
location and secure with hardware
removed in step 6.
2. Install battery.
3. Position battery hold-down bracket over
battery.
4. Reconnect fuel line outside of battery
hold-down bracket.
IMPORTANT: Ensure fuel line is securely
installed outside of battery hold-down
bracket.
5. Tighten previously removed hardware
securing battery and battery hold-down
bracket in step 3.
6. Connect positive (+) cable first, then
negative (–) cable.
7. Apply petroleum jelly or dielectric grease
to battery cable ends and terminals.
2
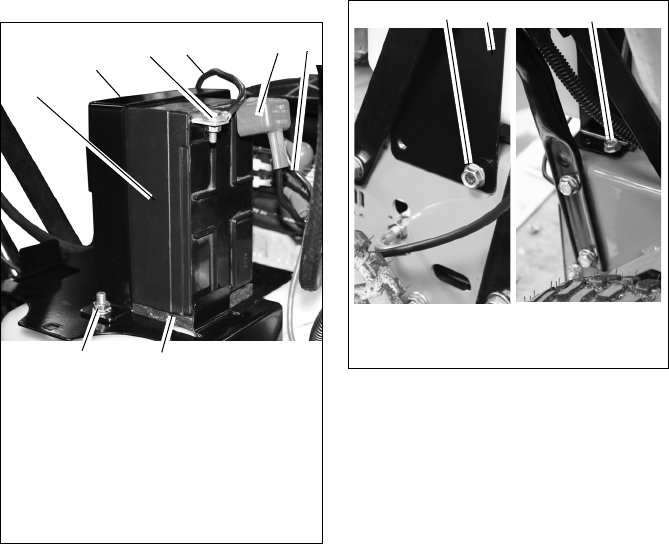
1. Negative (–)
Cable
2. Negative (–)
Terminal
3. Positive (+)
Cable
4. Positive (+)
Terminal
5. Battery
6. Hardware
7. Battery Mat
8. Battery Hold-
down Bracket
5
3
6
7
8
2
4
Figure 19
Figure 20
1. Nuts and Bolts 2. Battery Mount
Bracket
1
2
1


