


GB3
Operating times:
Please comply with any municipal regulations
on the operation of lawn mowers !
Monday – Saturday: Sunday and public
holidays:
7.00 – 12.00 a.m. not permitted
3.00 – 7.00 p.m.
Assembly
Assemble this mower in accordance with the
separately enclosed assembly manual.
Environmental protection, disposal
The packaging material is made of recyclable
materials. Dispose of the packaging materials in
accordance with regulations.
Switching on the mower
Do not switch on the mower before it has been
completely assembled.
The number printed on the left before the
text (e.g. ) refers to the diagrams.
Petrol engine:
Before switching on the machine for the first
time, full it up with oil and petrol!
The operating manual supplied by the
engine manufacturer for the petrol engine
must be followed.
Drive gears:
Gear oil has been filled at the works.
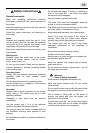
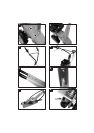
Setting the handlebar height
1
Set the height of the handlebar according to
the user's height.
The height is usually adjusted to hip level.
• Loosen the screws on the housing console.
• Set the height of the handlebars using the
longitudinal holes.
• Retighten the screws.
2
Depending on the model, the handlebar can
additionally be adjusted using the upper or lower
height settings on the housing console.
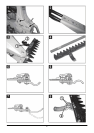
Setting the cutting height
The cutting height is adjusted using the skids (2).
3
Standard cutter bar
steplessly adjustable cutting height up to approx. 6
cm
• Loosen nuts
.
• Move the skids
to the required height.
• Retighten the nuts.
Both skids must be set to the same height !
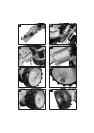
4
ESM cutter bar
a) Mounting the skid holders as
skids
The cutter bar cuts close to the ground
5
• Mount the adjustable skid holders as shown
in the illustration.
(the curved side points downwards).
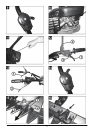
b) Mounting adjustable skids
steplessly adjustable cutting height up to
approx. 6 cm
6
• Mount the adjustable skid holders as shown
in the illustration.
(the curved side points upwards).
7
• Mount the skids as shown in the illustration.
8
Setting the cutting height
• Loosen the nuts
(2 nuts per skid).
• Move the skids
to the required
height.
• Retighten the nuts.
Both skids must be set to the
same height!
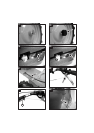
Starting the engine
The clutch levers for the wheel and cutter
drives must not be engaged when starting the
engine!
9
Set the throttle lever to the << START>>
position.
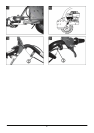
10
Press the primer button 3x with intervals of
approx. 2 seconds.
If the temperature is below 10° C, press the
primer button 5x.
If the engine is warm, do not press the primer
button!
i
3