


GB
GB 1
Assembly BM 5001-R (B&S)
Fill the mower with engine oil and
petrol only after it has been
completely assembled!
Pull off the spark plug connector
before starting the assembly!
i
The number printed on the left before
the text (e.g.
3
) refers to the diagrams.
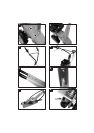
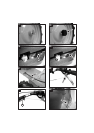
.1. .2. Loosen screws and rotate handlebar
console upwards – retighten screws.
Assembly of handlebars on console
.3. Handlebars
.4. Mount handlebars on console.
Hexagonal screw M8 x 25 - (2x)
Hexagonal nut M8 self-locking - (2x)
Bowden cable guide - (1x)
.5. The handlebars can be set to the user's
height by attaching them to the lower or
upper position.
.6. Mount the Bowden cable guide together
with the lower screw - tighten the nuts.
Assembly of blade holder
.7. Blade holder
.8. Mounting bush on the housing to
accommodate the blade holder.
.9. Lightly grease the mounting bush and insert
the blade holder.
10. Fully insert the blade holder and place the
V belt around the pulley.
Place the V belt around the lower pulley
in the housing.
Assembly of recoil springs
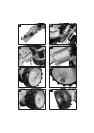
11. 12. y Place the mower on its side.
y Hook in the recoil springs (2x).
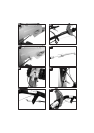
Assembly of the double wheels
Carry out the following steps on both
drive wheels.
i
13. Remove screw
hexagonal screw M8 x 45
hexagonal nut M8 self-locking
14. y Mount axle extender
y Re-insert screw and retighten nut.
15. Push the wheel onto the axle extender
16. Check the orientation of the wheel – the
tyre profiles should form a V viewed in the
direction of travel.
17. Secure wheel with nut
Washer Ø 10 x Ø 35 x 5
Hexagonal nut M10 self-locking
18. Press on protective cap
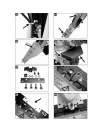
Assembly of Bowden cables
a) Bowden cable for throttle
y Set the throttle lever on the right-hand
handlebar to the << START>> position.
19. Push the governor lever on the carburettor
completely to the left (= start position).
20. y Insert the angled end of the Bowden
cable wire into the governor lever.
y Insert the Bowden cable sheath in the clip
y Gently push back the Bowden cable
sheath by hand until a resistance can be
felt.
Clamp the Bowden cable sheath in this
position.
Do not kink the Bowden cable during
assembly.