


8
USING YOUR SPREADER
We do not recommend the use of any powdered lawn
chemicals,duetodifcultyinobtainingasatisfactoryor
consistentbroadcastpattern.
1. Determineapproximatesquarefootageofareatobe
coveredandestimateamountofmaterialrequired.
2. Beforellingthehoppermakesuretheowcontrolarm
is in the off position and the closure plate is shut.
3. Breakupanylumpyfertilizerasyoullthehopper.
4. Settheadjustablestopwiththeowcontrolarmstillin
the off position. Refer to the application chart on this
pageandtotheinstructionsonthefertilizerbagtoselect
theproperowratesetting.
5. The application chart is calculated for light to heavy
applicationatavehiclespeedof3mph,or100ft.in23
seconds.Avariationinspeedwillrequireanadjustment
oftheowratetomaintainthesamecoverage.The
fasteryoudrive,thewiderthebroadcastwidth.
6. Makesurethedrivepinisinstalledintheaxlebefore
starting the spreader.
7. Alwaysstartthetractorinmotionbeforeopeningclosure
plate.
8. Alwaysshuttheclosureplatebeforeturningorstopping
the tractor.
9. Iffertilizerisaccidentallydepositedtooheavilyinasmall
area,soaktheareathoroughlywithagardenhoseor
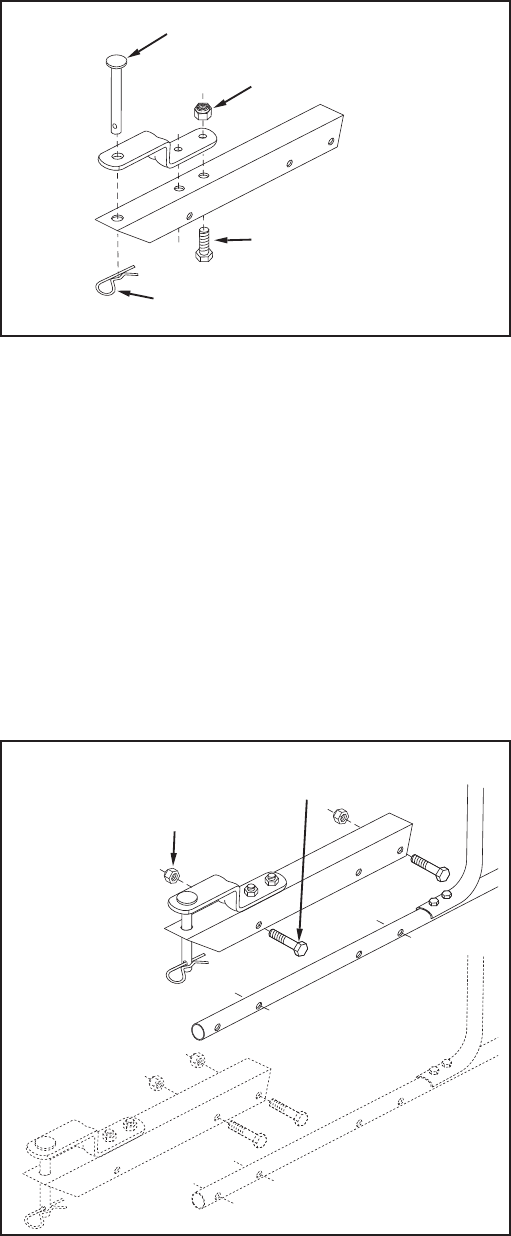
sprinklertopreventburningofthelawn.
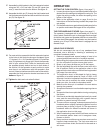
10. Toinsureuniformcoverage,makeeachpasssothatthe
broadcastpatternslightlyoverlapsthepatternfromthe
previouspassasshowningure18.Theapproximate
broadcastwidthsfordifferentmaterialsareshownin
the application chart on this page.
11. Whenbroadcastingweedcontrolfertilizers,makesure
the broadcastpattern doesnot hit evergreen trees,
owersorshrubs.
12. Heavymoistureconditionsmayrequireacoveroverthe
hopper to keep contents dry. The vinyl cover acts as a
windandmoistureshield,butshouldnotbeusedasa
rain cover.
OPERATION
SETTING THE FLOW CONTROL (gure14onpage7.)
1. Loosenthenylonwingnut,settheadjustablestoptothe
desiredowratesettingandretightenthewingnut.The
higherthesettingnumber,thewidertheopeninginthe
bottomofthehopper.
2. Refer to the application chart on page 9 and to the
instructionsonthefertilizerbagtoselecttheproperow
rate setting.
3. Pulltheowcontrolarmagainsttheadjustablestopforthe
on position and toward the hopper for the off position.
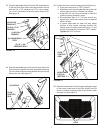
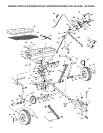
THE FREE WHEELING FEATURE (gure4onpage5.)
Thespreaderisequippedwitharemovablepinintheleft
(drive)wheel.Removethepintodisengagethedrivewheel
sothattheaxle,gearsandspreaderplatedonotrotate.With
thedrivewheeldisengaged,thespreadermaybetowedat
speedsupto20mph.Ifthedrivewheelisengageddonot
exceed6mph.
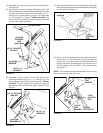
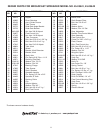
FIGURE 17
(G) 1/4" NYLOCK
HEX NUT
(B) 1/4" x 1-3/4"
HEX BOLT
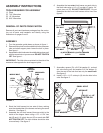
29. Formostvehicles,assemblethehitchextensionbracket
totheholesinthehitchtubeshownatthetopofgure
17.Usetwo1/4"x1-3/4"hexbolts(B)and1/4"nylockhex
nuts(G)tightenedonlyngertight.Attachthespreader
hitch to your vehicle hitch. Check for interference with
thespreaderdirectlybehindandouttobothsidesof
thevehicle.Liftthespreaderateachpositiontomake
surethereisnointerferencewiththespreader'sow
control.Ifthereisinterferencewiththerearofthevehicle,
assemblethehitchextensionbracketasshownatthe
bottomofgure17.
30. Tightentheboltsandnutswhennished.
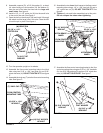
27. Assemblethehitchbrackettothehitchextensionbracket
usingtwo3/8"x3/4"hexbolts(D)and3/8"nylockhex
nuts(I).Inserttheboltsfromthebottom.Seegure16.
28. Assemblethehitchpin(P)throughthehitchbracketand
thehitchextensionbracketandsecurewiththehaircotter
pin(O).Seegure16.
FIGURE 16
(D) 3/8" x 3/4"
HEX BOLT
(I) 3/8" NYLOCK
HEX NUT
(P) HITCH PIN
(O) 1/8" HAIR
COTTER PIN