


Setting Up 1
Agilent 6000 Series Oscilloscopes Programmer’s Quick Start Guide 9
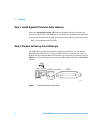
Using the USB (Device) Interface
1 Connect a USB cable from the controller PC’s USB port to the “USB
DEVICE” port on the back of the oscilloscope.
This is a USB 2.0 high speed port.
2 On the oscilloscope, verify that the controller interface is enabled:
a Press the Utility button.
b Using the softkeys, press I/O and Controller.
c Ensure the box next to USB is selected( ). If not( ), use the Entry
knob to select USB; then, press the Control softkey again.
Using the LAN Interface
1 If the controller PC isn’t already connected to the local area network (LAN),
do that first.
2 Get the oscilloscope’s network parameters (hostname, domain, IP address,
subnet mask, gateway IP, DNS IP, etc.) from your network administrator.
3 Connect the oscilloscope to the local area network (LAN) by inserting LAN
cable into the “LAN” port on the back of the oscilloscope.
4 On the oscilloscope, verify that the controller interface is enabled:
a Press the Utility button.
b Using the softkeys, press I/O and Controller.
c Ensure the box next to LAN is selected( ). If not( ), use the Entry
knob to select LAN; then, press the Control softkey again.
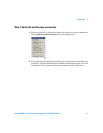
5 Configure the oscilloscope’s LAN interface:
a Press the Configure softkey until “LAN” is selected.
b Press the LAN Settings softkey.
c Press the Addresses softkey. Use the IP Options softkey and the Entry
knob to select DHCP, AutoIP, or netBIOS. Use the Modify softkey (and
the other softkeys and the Entry knob) to enter the IP Address, Subnet
Mask, Gateway IP, and DNS IP values. When you are done, press the
return (up arrow) softkey.
d Press the Domain softkey. Use the Modify softkey (and the other
softkeys and the Entry knob) to enter the Host name and the Domain
name. When you are done, press the return (up arrow) softkey.