


16
• Flip seat up and clean the area around the
hydraulic oil dipstick to prevent debris from entering
the crankcase. See Figure 15.
• Remove the hydraulic fill plug/dipstick and read the
level:
If hydraulic oil level is inside operating range, then do
nothing.
If hydraulic oil level is below operating range, the add
hydraulic oil before operating. Also check for leaks.
If hydraulic oil level is above operating range, then drain
excess oil before operating.
• Reinstall the dipstick completely into the fill tube.
Adding Hydraulic Oil
WARNING: Never overfill the hydraulic
units. Damage can result if the oil level is
not within the operating range. When
adding hydraulic oil, do so in small
quantities and recheck the oil level before
adding more.
• Place the Z-Series on a level surface and engage
the parking brake.
• Stop the engine and remove the key from the
ignition switch.
• Clean the area around the hydraulic oil dipstick to
prevent debris from entering the crankcase.
• Remove the hydraulic fill plug and insert a clean
funnel into the hydraulic fill point. See Figure 15.
• Pour proper amount of hydraulic oil level, insert the
dipstick, and check the hydraulic oil level.
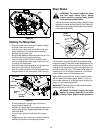
Draining Hydraulic Oil
• Place the Z-Series on a level surface and engage
the parking brake.
• Stop the engine and remove the key from the
ignition switch.
• Remove the mower deck. See Removing the
Mower Deck section.
• Flip seat up and clean the area around the
hydraulic oil dipstick to prevent debris from entering
the crankcase.
• Remove hydraulic fill plug/dipstick.
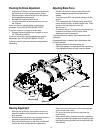
• Place a suitable container (at least 2 gallon) under
the hydraulic oil filter.
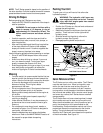
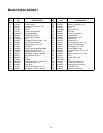
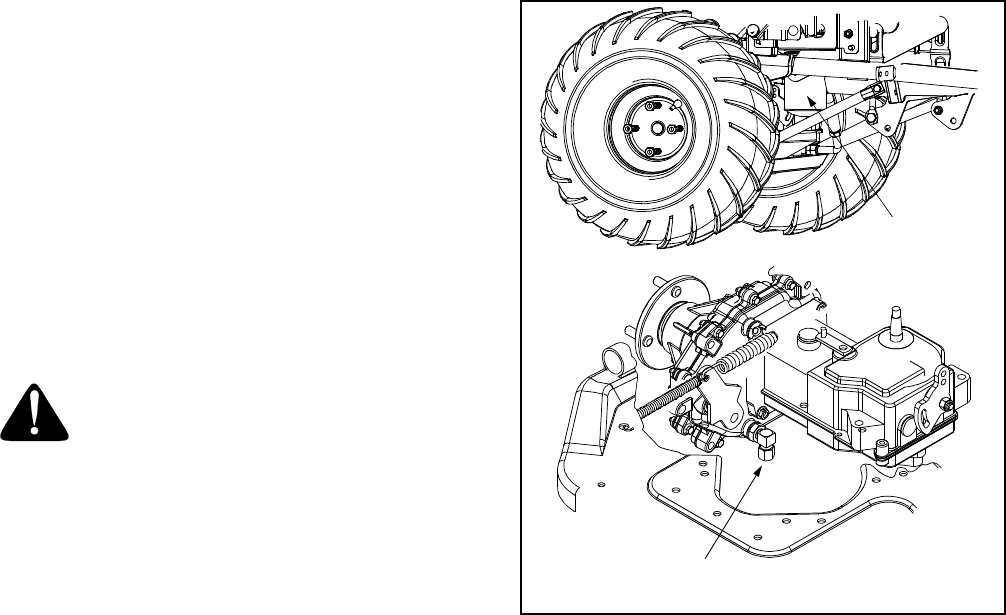
• Remove the hydraulic filter to allow hydraulic oil to
drain. See Figure 16.
• Place a small pan under the skid plate and drain oil
from both left and right axles.
• Replace both axle drain plugs and install new
hydraulic oil filter.
• Add proper amount of hydraulic oil to reservoir.
• Run and check oil level.
Figure 16
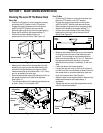
Replacing The Head Lamp Bulb
• Detach the bottom of the rubber boot cover on the
drive handles.
• Slide the boot cover all the way up (toward the drive
handles) to access the drive handle bolts.
• Remove drive handle bolts, drive handles, and
rubber boot.
• Remove the four bolts securing the retaining plate
to the control tower cover.
• Pull up on the control tower cover and slide up and
over the control tower.
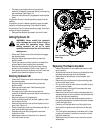
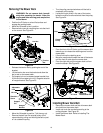
• Locate the rear of the light fixture where the wire
attaches. See Figure 17.
• Remove the wire from the light bulb assembly and
squeeze the tab on the connector that attaches the
wire to the light bulb assembly.
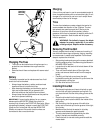
• Pull the wire from the light bulb assembly and turn
the light bulb assembly counterclockwise to release
it from the light fixture.
• Carefully pull the light bulb out of the light fixture
and insert the replacement light bulb into the light
fixture.
• Turn the light bulb assembly clockwise until it locks
in place and carefully insert the connector into the
light bulb assembly.
• Replace the control tower cover and drive handle
assemblies.
Hydraulic
Oil Filter
Left Transmission
Drain Plug