


17
xPower600 Owners Manual
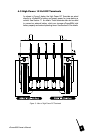
8. Take the other end of the jump-start cables and connect the black
negative (-) clamp to xPower600s Negative Terminal (black). You
are now ready to start the engine.
9. If the vehicle fails to crank, disconnect the jump-start cables in
reverse order of steps 5-8. Ensure that the contact areas are
clean, then repeat steps 5 through 8.
10. After the vehicle is started and while the cables are still connected,
it is a good idea to run the motor at fast idle for 5 minutes to fast-
charge xPower600s battery. After recharging, remove the jump-
start cables in the reverse order of steps 5-8.
7.2 Jump-Starting via a Vehicles Lighter Plug
Socket
The following simple procedure is often sufficient to start a vehicle when
its battery has sufficient power to crank the engine slightly, but not start
it.
1. Connect your vehicles cigarette lighter socket to xPower600s DC
Power Socket using the DC Charging Cable. You may need to
switch the ignition key to the accessory position to supply power
to the lighter socket.
2. Wait 15 minutes while xPower600 partially charges your vehicles
battery, then remove the DC Charging Cable before attempting to
start the engine.
3. If your vehicle does not start, attempt to jump-start as described in
Section 7.1.
CAUTION: Do not attempt to start your vehicle while the DC Charging
Cable is connected to the vehicles 12 Volt outlet or lighter socket.
Remove the DC Charging Cable first, then start your vehicle. This will
prevent the fuse protecting the vehicles 12 Volt outlet from blowing.