


Operation 13
MAN0813 (3/17/2010)
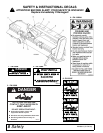
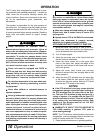
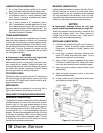
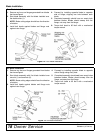
Figure 7. Clevis Hitch Adjustment
5. Slide clevis hitches, A-frame/gearbox stand, and
attaching rear z-clamp bracket to the desired dis-
tance.
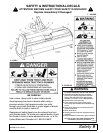
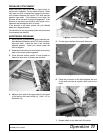
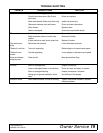
Figure 8. Gearbox and Clamp Adjustment
6. Retighten the lower clevis hitch, A-frame/gearbox
stand, and attaching rear z-clamp bracket hard-
ware per the torque chart in the back of this man-
ual.
7. Reconnect tiller to the tractor.
OPERATING PROCEDURE
Only engage power when equipment is at
ground operating level. Always disengage power
when equipment is raised off the ground.
Read and understand the rotary tiller and tractor opera-
tor's manuals before operating the tiller. Failure to do
so may result in death, serious personal injury or prop-
erty damage.
Never raise the tiller more than a few inches off the
ground when traveling from job site to job site.
Shut off the engine, set brake, remove key and remove
seat belt. Dismount the tractor.
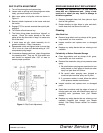
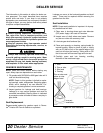
Tractor Stability
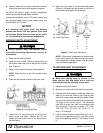
A minimum 20% of tractor and equipment
weight must be on the tractor front wheels when
attachments are in transport position. Without this
weight, front tractor wheels could raise up result-
ing in loss of steering. The weight may be attained
with front wheel weights, ballast in tires or front
tractor weights. Weigh the tractor and equipment.
Do not estimate.
Figure 9. Tractor Stability (Typical)
Clutch Run-In
Clutch run-in must be done prior to initial use and
before each season or whenever tiller has been setting
idle for more than two months. See Slip Clutch Adjust-
ment page 17 for the run-in procedure.
After you have completed the run-in of the clutch,
return to the operating instructions and proceed with
start-up. Failure to run the clutch in could result in pre-
mature driveline failure and warranty will be voided.
NOTE: Tillers equipped with shear bolt driveline
protection do not have clutches. These drives do
not require a run-in procedure prior to operation.
Start-Up Sequence
1. Start tractor engine.
2. Lower tiller slowly, nearly to the ground.
3. Engage tractor PTO.
4. Lower the tiller completely to the ground.
5. Increase engine rpm to normal operating speed of
540 rpm.
6. Move tractor forward. Select a slow tractor speed
and increase slightly until operation is satisfactory.
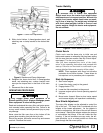
Rear Shield Adjustment
The rotary tiller tailgate can be adjusted to control the
tilth of the soil. The finest finish is achieved with the
tailgate at the lowest adjustment. As the tailgate is
raised, or adjusted up, the finish of the soil will become
more coarse. Raising the tailgate reduces the amount
of recirculation that occurs to the soil inside the tiller
housing. If the soil conditions are very rocky, the tail-
gate should be run in a raised position so rocks may
pass through the tiller more quickly
(Rev. 6/7/2011)