


8 Installation
MAN0258 (Rev. 12/14/2007)
4. Rotate vacuum housing assembly into place so
that the clevis shaft on vacuum housing assembly
slips inside vacuum front mount (38).
5. Install lynch pin (62) to lock the housing into place.
NOTE: If necessary, adjust the position of the
vacuum front mount to allow for easy installation of
lynch pin.
6. Tighten hardware.
Remove Vacuum Housing
1. Remove lynch pin (62).
2. Rotate vacuum housing assembly away from
vacuum front mount (38).
3. Lift vacuum housing assembly from vacuum
mount (35).
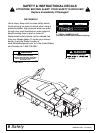
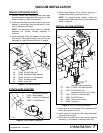
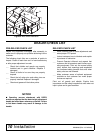
ATTACH DISCHARGE CHUTE
Be sure either the discharge chute, mulching
end cap, or complete vacuum attachment is
installed and in good condition. Replace if dam-
aged.
1. Remove vacuum housing from deck.
2. Install chute adapter with discharge chute
attached.
3. Insert the pivot shaft of chute adapter (59) into
sleeve of vacuum mount (35).
4. Rotate the chute adapter in place so that the clevis
shaft on chute adapter slips inside vacuum front
mount (38).
5. Install the lynch pin (62), to lock the chute adapter
into place.
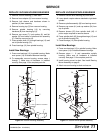
Figure 4. Discharge Chute with Adapter Installed
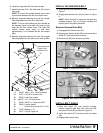
INSTALL BEARING MOUNT ASSEMBLY
Remove Hardware
1. Remove center and right belt shield.
2. Remove top bolt (A), cupped washer (B), and
spacer from the right spindle assembly.
Figure 5. Right Spindle and Sheave Assembly
Install Bearing Mount
Refer to Figure 6.
1. Install washer (49) and lower coupler drive (39)
over right spindle sheave.
2. Align keyway of sheave and flex coupler and install
.25 x .069" square key (40) that comes with kit.
3. Secure sheave and flex coupler to spindle shaft
using sheave bolt (41) and flat washer (9).
4. Place nylon flex coupler sleeve (42) over lower flex
coupler drive (39) and align grooves.
5. Install vacuum drive mount (43) by positioning the
drive spindle assembly into the nylon flex coupler
sleeve (42).
DP1
62
A
B
DP2