


54
7 Using The Menus
Two menus are provided for configuring the Atlas Monitor. The items on these menus are choices that
you might make to configure the Atlas Monitor to your needs when you first place it into service. You may
change the date/time setting for Daylight Savings/Standard time, or when traveling across time zones.
You might change the Advanced Configuration settings when monitoring different patient health issues,
or for different display preferences.
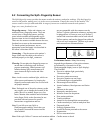
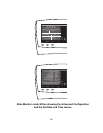
7.1 The Set Date and Time and Other Options Menu
Pressing the
Date/Time button on the bottom right of the monitor will access a menu from which you can
manage several settings. The Time and Date can be set using the
Select and Set buttons. The Other
Options menu provides a list of buttons that have special functions.
Setting Date and Time - You will need to set the
Date and Time when:
• First unpacking and installing the monitor.
• Adjusting to different time zones.
• Starting or ending Daylight Savings Time.
To set the Date and Time:
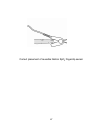
• Press the
Date/Time button (labeled with a
clock icon) to get to the Set Date and Time
menu.
• Use either Select button to sequentially
highlight the day, month, year, hours, minutes
and seconds.
• Use either
Set button to scroll through the
values for each setting.
• Stop pressing the
Set button when the correct
value is shown.
• Use either
Select button sequentially to
highlight the next item you want to set, and
repeat.
• Press the
Date/Time button again to return to
the waveform screen when the date and time
are correct.
The monitor now has the correct Time and Date,
and the monitor’s internal battery will retain these
settings, even after turning off the power and
unplugging the monitor.
Other Options menu - the buttons:
• Trend
• Lead Select
• Print (or Freeze)
• CO
2
/RESP ALARMS Off (model 623xx only)
which have been described earlier, serve a second
function, which is listed on this menu.
The
Trend button accesses the Advanced
Configuration menu, which allows other settings
to be changed.
The
Lead Select button accesses the Service
Mode screen, which allows a qualified technician
to service various aspects of the monitor.
Note: Service Mode is never used by the clinician
and is not to be used in any patient-oriented
operation of the monitor.
The
Print button (or Freeze in those monitors
without a printer) saves the current alarm settings
as set by the user. These saved alarm settings are
used instead of the factory defaults when the
instrument is turned on.
The
CO
2
/RESP ALARMS Off button initiates the
process of CO
2
Reset.
Exiting the Set Date and Time Menu - To exit
the menu, press the
Date/Time button again.