


7
S
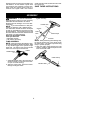
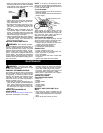
Keep you edging path straight by aligning
the blade gui de rib on the rear of the blade
guard with the edge of the sidewalk. Keep
all wheels flat on the walkway.
Blade
Guide Rib
S
Always work going away from people and
solid objects such as walls, large stones,
trees, automobiles, etc.
S
Be careful when edging near trees or valu-
able plants. The high speed metal blade
may cut roots and cause damage to the
plants.
S
If the blade stalls, immediately move the
unit rearward slightly to allow the blade to
restart. If the blade continues to s tall, stop
the engine, disconnect the spark plug, and
inspect for blockage or damage.
S
Always keep thebladearea clean. Stop the
engine, makesure theblade has complete-
ly stopped turning, and disconnect the
spark plug before cleaning.
SETTING THE EDGING DEPTH
WARNING:
Never attempt t o adjust
the depth adjusting skid when the engine is
running. Always release the throttle trigger,
wait until the blade stops turning, move the
ON/OFF switch to the OFF position, and dis-
connect spark plug bef ore making adjust-
ments. Your edger is equipped with several
edging depths. The depth used will depend
on your personal edging preference and the
condition ofthe area where the edging opera-
tion is to be done.
NOTE:
If t he area to be edged has never
been cut orseveral weekshave passedsince
the last cut, the first edging should be done at
no more than hal f depth.
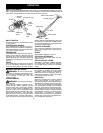
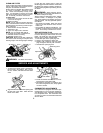
To set the depth:
S
Move the depth control lever forward for
shallower edging.
S
Move the depth control lever backward for
deeper edging.
Support Arm
Depth
Adjusting
Skid
Depth C ontrol Lever
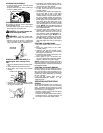
When edging, the trigger handle must be
raised until the skid rests on the ground. The
trigger handle must be held in the raised posi-
tion during the entire edging operation to
maintain a consistent edging depth.
DEPTH ADJUSTING SKID
The surface of the depth adj usting skid will
wearoveraperiod oftime. This part isrevers-
ible to provide a second wear surface.
1. Remove the two mounting screws which
hold the skid to the support a rm.
2. Rotate the skid 180 degrees.
3. Reinstall the mounting screws.
EDGING TIPS
S
Inspect unit before each use.
S
Inspect the area to be cut before each use.
S
Keep unit in front of your body.
S
Cut at full throttle.
S
Keep the wheels and skid in contact with
the ground.
S
Always work going away from others.
MAINTENANCE
WARNING:
Disconnect the spark
plug before performing maintenance except
for carburetor adjustments.
GENERAL RECOMMENDATIONS
Thewarranty onthis unit doesnot coveritems
that have been subjected to operator abuse
or negligence. To receive full value from the
warranty, the operator must maintain unit as
instructed in this manual. Various adjust-
ments will need to be made periodically to
properly maintain your unit.
S
Once eachyear,replace the spark plug, re-
place air filter element and check blade for
wear. Anew sparkplug andaclean/new air
filter element assures proper air/fuel mix-
ture and helps your engine run better and
last longer
.
CHECK FOR DAMAGED OR
WORN PARTS
Contact an authorized service dealer for re-
placement of damaged or worn parts.
S
ON/OFF Switch -- Ensure ON/OFF switch
functions properly by moving the switch t o
the OFF position and assure the engine
stops; then restart engine and continue.
S
Fuel Tank -- Discontinue use of edger if fuel
tank shows signs of damage or leaks.
S
Blade Guard -- Discontinue use of edger if
blade guard is damaged.
CHECK FOR LOOSE
FASTENERS AND PARTS
S
Blade nut
S
Muffler
S
Cylinder shield
S
Clutch
S
Throttle trigger
S
Handle screws
S
Fasteners
INSPECT AND CLEAN UNIT & LA-
BELS
S
After each use, inspect complete unit for
loose ordamaged parts. C lean theunit and
labels using a damp cloth with a mild deter-
gent.
S
Wipe off unit with a clean dry cloth.