


3
CUTTING SAFETY
W ARNING:
Inspect the area before
each use. Remove objects (rocks, broken
glass, nails, wire, etc.) which can be thrown
by or become entangledin line. H ardobjects
can damagethetrimmer headandbethrown
causing serious injury .
S
Use only for trimming, scalping, m owing and
sweeping. Do not use for edging, pruning or
hedge trimming.
S
Keep firm footing and ba lance. Do not over-
rea ch.
S
Keep all parts of your bo dy a way from muff ler
and spinning line. Ke ep engine belo w waist
level. A hot muffler can cau se seriou s burns.
S
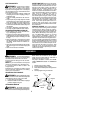
Cut from your right to your left. Cutting on left
side of the shield will throw debris a way f rom
the o p erator.
S
Use only in daylight or good artificial light.
S
Use only fo r jobs explained in this manual.
TRANSPORTINGAND STORAGE
S
Allow e ng ine to c ool; secure unit b efo re stor-
ing or transporting in vehicle.
S
Empty the fuel tank before storing o r trans-
porting theunit.Use u pfuel leftin thecarbure-
torby startingthe en gine an d letting it rununtil
it stops.
S
Store u nit and fuel in a rea where fuel vapo rs
cannotreach sparks o r op enflames from wa-
ter heaters, e lectric m otors or switches, fur-
naces, etc.
S
Storeunit solinelimiterbladecannota cciden-
tally cause injury.Theunit canbehungby t he
shaft.
S
Store u nit out of re ach o f children.
SAFETYNOTICE:
Exposure tovibrations
through prolonged use of gasoline powered
handtools couldcausebloodvessel ornerve
damage in the fingers, hands, and joints of
people prone to circulation disorders or ab-
normal swellings. Prolonged use in cold
weatherhasbeenlinkedtobloodvesseldam-
ageinotherwisehealthypeople. Ifsymptoms
occur such as numbness, pain, loss of
strength, change in skin color or texture, or
loss offeeling in the fingers, hands, or joints,
discontinuetheuseofthis toolandseekmed-
ical attention. An anti--vibration system does
not guarantee the avoidance of these prob-
lems. Users w ho operate pow er tools on a
continual and regular basis must monitor
closelytheirphysical conditionandthecondi-
tion of this tool.
SPECIALNOTICE:
This unit i s equipped
with a temperaturelimiting muf fler and spark
arresting screen which meets the require-
mentsofCaliforniaCodes4442and4443. All
U.S. forest l and and the states of California,
Idaho, M aine, Minnesota, New Jersey , Or e-
gon, and Washington require by law that
many internal combustion engi nes be
equippedwithasparkarrestingscreen. Ifyou
operateinalocalewheresuchregulationsex-
ist, youarel egallyresponsibleformaintaining
theoperatingc onditionoftheseparts. Failure
to do so is a violation of the law. For normal
homeowneruse,themufflerands parkarrest-
ing screen will not require any service. After
50 hours of use, we recommend that your
mufflerb eservicedorreplacedbyy ourautho-
rized service dealer.
ASSEMBLY
W ARNING:
If received assembled,
repeatallstepstoensureyourunit isproperly
assembled and all f asteners are secure.
Examine parts for damage. Do not use dam-
aged parts.
NOTE:
If you need assistance or find parts
missing or damaged,call 1-800-554-6723.
It is normal for the f uel filter to rattle in the
empty fuel tank .
Findingfuel or oilresidueon muf fleris normal
due to carburetor adjustments and testing
done by the manufacturer.
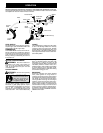
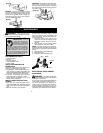
ADJUSTINGTHE HANDLE
W ARNING:
Whenadju stin gt hea s sist
handle,be sure it remains abovethe safety label
and below the mark o r a rrow on the shaft.
1. Loosen wing nut on handle.
2. Rotate thehandle onthe shaftto an u pright
position; r etighten w ing nut.
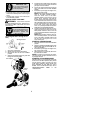
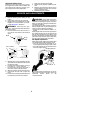
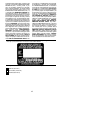
ATTACHING SHIELD
W ARNING:
The shield must be prop-
erly installed.The shield provides partial protec-
tion from therisk of thro wn objects to theop era-
tor andothers and is equippedwith a line limiter
blade which cuts excess line to the proper
length. T he line limiter blade (on underside o f
shield) is sharp and can cut y ou.
For proper orientation of shield, see KNOW
YOUR TRI M M ER illus tra tio n in OPER ATION
section.
1. Remove wing nut from shield.
2 . Insert b racket int o slot a s shown .
3. Pivot shield unt il bolt p assesthroughholein
br acke t.
4. Securely tig hten w ing nut onto bolt.
Slot
Shield
Wing
Nut
Bracket
Line Limiter
Blade
PIVOT