10
SERVICE
We recommend all service and adjustments
not listed in this manual be performed by an
Authorized Service Dealer.
CARBURETOR ADJUSTMENT
Your carbur etor is equipped w ith limiter caps.
Damage will occur if you turn the needles be-
yond the limiter caps. Car bur etor adjustment is
a complicated task. We recommend that you
take your unit to an A uthorized Service Dealer.
SPARK PLUG
Replace s par k plug yearly w ith a Champion
CJ- 8Y p lug; spark plug gap i s .025 in.
IGNITION TIMING
Ignition timing is fixed, non-adjustable.
NEED ASSISTANCE?
NEED ASSISTANCE?
Call 1-800-554-6723 for assistance.
NEED SERVICE PARTS?
Contact your dealer or call 1-800-554-6723.
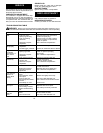
TROUBLE CAUSE REMEDY
Engine will not
start.
S
Engine flooded.
S
Fuel tank empty.
S
Spark plug not firing.
S
Fuel not reaching
carburetor.
S
Carburetor requires
adjustment.
S
See “Starting Instructions.”
S
Fill tank with correct fuel mixture.
S
Install new spark plug.
S
Check for dirty fuel filter; replace.
Check for kinked or split fuel line;
repair or replace.
S
See “Carburetor Adjustments.”
Engine will not
idle properly.
S
Carburetor requires
adjustment.
S
Throttle trigger problems.
S
See “Carburetor Adjustments.”
S
Contact an Authorized Service Dealer.
S
Air filter dirty.
S
Spark plug fouled.
S
Carburetor requires
adjustment.
Engine will not
accelerate,
lacks power, or
dies under a
load.
S
Clean or replace air filter.
S
Clean or replace spark plug
and re-gap.
S
See “Carburetor Adjustments.”
Engine smokes
excessively.
S
Fuel mixture incorrect.
S
Air filter dirty.
S
Carburetor requires
adjustment.
S
Empty fuel tank and refill with
correct fuel mixture.
S
Clean or replace air filter.
S
See “Carburetor Adjustments.”
Engine runs hot
.
S
Fuel mixture incorrect.
S
Spark plug incorrect.
S
Carburetor requires
adjustment.
S
Empty fuel tank and refill with
correct fuel mixture.
S
Replace with correct spark plug.
S
See “Carburetor Adjustments.”
TROUBLESHOOTING TABLE
WARNING:
Always stop unit and disconnect spark plug before performing any of
the recommended remedies below other thanremedies that require unit to beoperating.
Line does not
advance or
breaks while
cutting.
Line welds
onto spool.
Line pulls
back into
head.
S
Line improperly routed in
head.
S
Line improperly would
onto spool.
S
Incorrect line size.
S
Not enough line outside
of head.
S
Dirt buildup on cover.
S
Check line routing.
S
Rewind line tightly and evenly.
S
Use onl y 0.080” diameter line.
S
Pull 4 inches of line outside of head.
S
Clean cover.
S
Incorrect line size.
S
Incorrect spool.
S
Line is being crowded
against material being
cut.
S
Use onl y 0.080” diameter line.
S
Replace with correct spool.
S
Cut with tip of line fully extended.
S
Too little line outside of
head.
S
Line size incorrect.
S
Remove cover and pull 4 inches
of line outside of head.
S
Use onl y 0.080” diameter line.


