


11
Cleaning the Air Filter
Clean and re-oil the air filter every 10 hours of operation. It is an
important item to maintain. Failure to maintain your air filter
properly can result in poor performance or can cause
permanent damage to your engine.
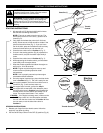
1. Remove air filter/muffler cover. Refer to Removing the Air
Filter/Muffler Cover.
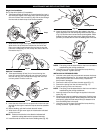
2. Turn cover over and look inside to locate the air filter.
Remove the air filter from inside the air filter/muffler cover
(Fig. 26).
3. Wash the filter in detergent and water (Fig. 27). Rinse the
filter thoroughly. Squeeze out excess water. Allow it to dry
completely.
AIR FILTER MAINTENANCE
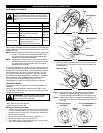
Removing the Air Filter/Muffler Cover
1. Place the choke lever in Position 2.
NOTE: The choke lever must be in Position 2 (Fig. 7) to
remove the air filter/ muffler cover.
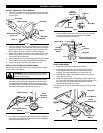
2. Remove the four (4) screws securing the air filter/muffler
cover (Fig. 25). Use a flat blade or T20 Torx bit screwdriver.
3. Pull the cover from the engine. Do not force.
Screws
Screws
Fig. 25
Reinstalling the Air Filter/Muffler Cover
1. Place the air filter/muffler cover over the back of the
carburetor and muffler. Align the screw holes.
2. Insert the four (4) screws into the holes in the air filter/muffler
cover (Fig. 25) and tighten. Do not over-tighten.
Blue Choke
Lever
Air Filter
Inside Muffler
Cover
Fig. 26
Fig. 27
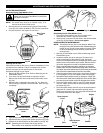
Fig. 28
Fig. 29
MAINTENANCE AND REPAIR INSTRUCTIONS
WARNING: To avoid serious personal injury,
always turn your unit off and allow it to cool before
you clean or service it.
SPARK ARRESTOR MAINTENANCE
NOTE: The exhaust can only flow in one direction: AWAY from
the engine. Pay close attention when disassembling the
muffler so you can put it back together correctly. Failure
to do so will damage the unit and may cause serious
personal injury.
1. Remove air filter/muffler cover. Refer to Removing the Air
Filter/Muffler Cover.
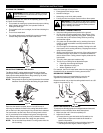
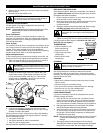
2. Locate the muffler, but do not remove it. Find the one (1)
screw on the bottom of the muffler (Fig. 30). These two
screws hold the Spark Arrestor Hood Assembly and the spark
arrestor screen to the bottom of the muffler. Remove the two
(2) screws using either a torx #20 or flat blade screwdriver.
3. Using a small flat blade screwdriver, carefully pry up the spark
arrestor screen from the recessed hole, taking care to notice that
the “raised” part of the spark arrestor screen is inside the recessed
hole. Remove the spark arrestor screen from the muffler.
4. Clean the spark arrestor screen with a wire brush. Replace it
if it is damaged, or if you are unable to clean it thoroughly.
5. Reinstall the spark arrestor screen by putting the “raised” por-
tion of the screen inside the recessed hole of the muffler. Make
sure that the spark arrestor screen fits flat against the muffler.
6. Place the spark arrestor plate on top of the spark arrestor
with the “raised” side up and the opening facing towards
the engine (Fig. 30).
7. Place the spark arrestor hood on top of the spark arrestor
plate with the “raised” side up and the opening facing
AWAY from the engine (Fig. 30). Verify that the exhaust will
be directed AWAY from the engine.
4. Apply enough clean SAE 30 oil to lightly coat the filter (Fig. 28).
5. Squeeze the filter to spread and remove excess oil (Fig. 29).
6. Replace the air filter inside the air filter/muffler cover (Fig. 26).
NOTE: Operating the unit without the air filter and air
filter/muffler cover assembly will VOID the warranty.
Fig. 30
Spark Arrestor
Screen
Spark Arrestor
Hood
Screw
Muffler
Engine
Tabs
Slots