


SECTION5: MAINTENANCE
WARNING: Before
inspecting, cleamngor serwcmg
the machine,shut off engine.
wait for all moving partsto come
to a completestop, disconnect
spark plug wire andmove wire
awayfrom sparkplug. Remove
ignition keyon electricstart
models.
Failuretofollow these
instructions canresult in serious
personalinjury or property
damage.
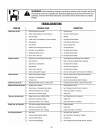
MAINTENANCESCHEDULE
PROCEDURE
Checkmotoroil level
Cleanengme
Checkdrivebelttension
Checknutsandbolts
Changemotoroil
Lubricatetiller
Serviceengineaircleanersystem
CheckgearoL]levelintransmission
Checktinesfor wear
Checkair 3ressurein tires
(EfunithaspneumatLctLresj
Servicesparkplug
NOTES
MOTES
2.3
2.7
A
4
4.6.9
4
7
5
5
5
1- CheckafterBrst2hoursofbreak-inooeranon
2 - Before eachuse.
3 - Every5 operatinghours.
4 - E[ _ry10 opera_mghours,
5- Every3Oonerannghours,
6 - Changemore frequem/y m ousrj cona/[/ons.
7 - See EngineOwner'sManual forservice
recommeearlons,
8- Whichevertime interval occurs first
9- Changeafterfirst2hoursofbreak-in
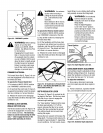
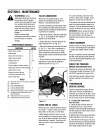
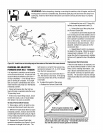
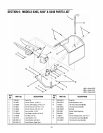
TILLER LUBRICATION
Afterevery10operatinghours,oil or
greasethelubricationpointsshownin
Figure5-1anddescribed below.
Usecleanlubricating oil (#30weight motor
oil is suitable) and cleangeneralpurpose
grease(greasecontaininga metallubricant
is preferred, if available).
• Removethewheels,cleanthewheelshaft
(A, Fig. 5-1) and apply a thincoating of
greasetOthe wheelshaft.
• Greasethe back,front and sides ofthe
depth regulator lever(B, Fig. 5-1).
• Removethe tines andcleanthe tineshaft
(C, Fig.5-1). Use a file or sandpaperto
gently removeanyrust, burrs or rough
spots (especiallyaround holes in shaft).
Applygreaseto endsof shaft beforeinstall-
ing tines.
• Oilthe threads onthe handlebarheight
adjustment screws andthe handlebar
If a cover is leaking, checkfor loose
screws. If the screws aretight, a new
gasket or oi!seal may be required.
If the leakisfrom arounda shaftand oil
seal, the oil seal probably needsto be
replaced. Seeyour authorizeddealeror
contact the factory for serviceor advice.
IMPORTANT:Neveroperatethe tiller if
the transmission is low on oil. Check
the oil levelafter every30 hours of
operationand wheneverthere isany oil
leakage.
CHECKHARDWARE
Checkfor looseor missing hardwareaf-
ter every 10 operatinghoursand tighten
or replace(as needed)beforereusing
tiller
Besureto checkthe screws underneath
thetiller hoodthat securethetransmis-
sioncoverandthe DepthRegulatorLever
to thetransmission.
attaching screws (D, Fig.5-1). CHECKTIRE PRESSURE
(Models with pneumatic tires)
Checktheair pressurein bothtires. The
air pressureshould be between15 PSI
and 20 PSI(pounds per squareinch).
Keepbothtires equally inflatedto help
prevent machinefrom pulling to one
side.
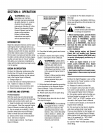
TRANSMISSION
GEAROILSERVICE
Figure5.1
CHECKFOROILLEAKS
Beforeeachuse,checkthetiller for signs of
an oil leak-- usually a dirty, oily accumu-
lationeither on the unit or on the floor.
A little seepagearound a cover or an oil
sealis usually not a causefor alarm. How-
ever,if the oil drips overnight, then imme-
diateattention is needed.Ignoring an oil
Checkthetransmission gear oil level
after every30 hoursof operationor
wheneveryou noticeany oil leak. Oper-
ating thetiller whenthe transmission is
low on oil can result in severedamage.
A. ToChecktheTransmission
GearOil Level:
1. Checkthe gear oil levelwhenthe
transmission is cool. Gear oil will
expandin warm operatingtemperatures
andthis expansionwill providean incor-
rect oil level reading.
2. With thetiller onlevelground, pullthe
Depth RegulatorLeverall the way up.
3. Removethe oil fill plug (A, Fig.5-2)
leakcanresult insevere transmission from thetransmission housingand look
damage] insidethe oil fill holeto locate the main
drive shaft situated belowthe hole.
17