


8
Mounting
WARNING! Mount your Inverter/Charger BEFORE DC battery and AC power
connection. Failure to follow these instructions may lead to personal injury and/
or damage to the Inverter/Charger and connected systems.
Tripp Lite manufactures a variety of different Inverter/Chargers with a variety of different mounting options for use in vehicular or non-vehicular
applications.TrippLiterecommendspermanentmountingofyourInverter/Chargerinanyoftheconfigurationsillustratedbelow.Usermust
supply mounting hardware and is responsible for determining if the hardware and mounting surface are suitable to support the weight of the
Inverter/Charger. Contact Tripp Lite if you require further assistance in mounting your Inverter/Charger.
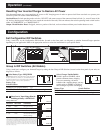
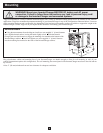
Horizontal Mount
A
Usingthemeasurementsfromthediagram,installtwouser-supplied¼"(6mm)fasteners
intoarigidhorizontalsurface,leavingtheheadsslightlyraised.
B
Slide the Inverter/
Charger back over the fasteners to engage the mounting slots molded on the bottom of the
Inverter/Charger cabinet.
C
Installandtightentwouser-supplied¼"(6mm)fasteners
into the mounting feet molded on the front of the Inverter/Charger cabinet.
The polycarbonate cabinet and mounting feet of your Inverter/Charger are durable enough to allow for wall mounting as well (if your
vehiclecompartmentrequiresthisconfiguration).Forwallmounting,thecontrolpaneloftheInverter/Chargermustfacetothesideandnot
up or down.
Allow2"(50mm)minimumfrontandrearclearanceforadequateventilation.
6.75 in.
(17.1 cm)
7.87 in.
(20 cm)
6.75 in.
(17.1 cm)
4.5 in.
(11.4 cm)
A
B
C