


Valve Removal and Replacement
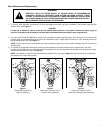
1. To remove valve assembly, squeeze ears of snap ring together with snap ring pliers (P/N 995-07) and remove snap ring from
sprinkler body. (See Figure 3.)
CAUTION
If snap ring is difficult to remove, there may be residual water pressure in the system. Recheck the water supply to
ensure it is turned off and all pressure has been totally eliminated before removing the snap ring and valve.
2. Use valve removal tool (P/N 995-08) to remove valve assembly from base of sprinkler body. Valve Removal Tool is inserted into
sprinkler body and pushed through valve ribs to the underside of valve. A slight twist will lock tool to valve enabling removal by
pulling straight up and out. (See Figure 4.)
NOTE: If valve removal tool is not available, use snap ring pliers to grasp rib of valve cylinder assembly and pull up and out of
sprinkler body.
3. To reinstall valve assembly with snap ring and to prevent damage to the communication tube in sprinkler body, use valve
insertion tool (P/N 995-76). Valve insertion tool will automatically line up valve assembly with sprinkler body communication tube
and correctly seat the snap ring. (See
Figure 5.)
NOTE: It is possible to install the snap ring backwards (upside down). See inset in Figure 5 to insure that snap ring is placed on
the insertion tool in the correct manner.
WARNING
POSITIVELY SHUT OFF WATER SUPPLY AT SOURCE PRIOR TO DISASSEMBLING
SPRINKLER. BLEED ALL PRESSURE FROM SYSTEM INCLUDING CONTROL TUBES.
FAILURE TO DEPRESSURIZE SYSTEM PRIOR TO SNAP RING REMOVAL COULD CAUSE
VALVE MECHANISM TO EJECT FROM SPRINKLER BODY UNDER PRESSURE RESULT-
ING IN POSSIBLE SERIOUS INJURY TO PERSONNEL.
7
Figure 5
Using Valve Insertion Tool to
Install Valve Assembly with Snap Ring
Figure 3
Using Snap Ring Pliers to
Remove Snap Ring
Figure 4
Using Valve Removal Tool to
Remove Valve Assembly