


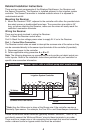
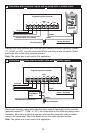

Initial Receiver Testing
Reconnect power to the controller and verify the Receiver’s Power Indicator is illumi-
nated. Hold the Sensor/Transmitter at close range to the Receiver, then lightly press
and hold the Test Spindle. The Sensor Status Indicator should illuminate and remain
on until the Test Spindle is released. The Signal Indicator should also illuminate during
the test to verify good signal strength. If either indicator does not illuminate, recheck
your wiring.
Verify that both antennas are fully extended and straight.
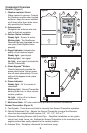
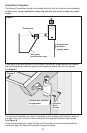
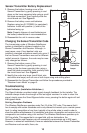
Rainfall Adjustment (Figure 6)
Prior to installing the Sensor/Transmitter,
check the current setting on the Rainfall
Adjustment Cap. The RainSensor can be
adjusted to detect average rainfall amounts
of 1/8", 1/4", 1/2", 3/4" or 1" before sus-
pending watering.
To adjust, turn the cap from the current set-
ting and engage the stationary pins with the
desired slot position. Be sure to align the
slot and pin properly as this adjustment
does not require excessive force.
Note: Avoid using the 1/8" setting in high-humidity conditions.
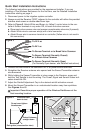
Sensor/Transmitter Installation
Select an installation site for the Sensor/Transmitter as close to the Receiver as possi-
ble to avoid interference of the wireless signal. The Sensor/Transmitter must be
installed where it has unobstructed exposure to rainfall and the sunlight conditions are
similar to those of the landscape being watered. Make sure the RainSensor will not be
in contact with spray from the sprinklers or runoff from the roof.
Testing Signal Strength at the Installation Site
Before installing the Sensor/Transmitter, test the signal strength again from the select-
ed installation site. The Receiver’s Signal Indicator verifies the strength of the last
valid received signal. To clear the Signal Indicator from the previous test, simply press
the Smart Bypass button once, then once again to exit the bypass mode.
Test the Sensor/Transmitter as described in “Initial Receiver Testing” above. A steady
Signal light indicates a good signal. A flashing indicator light indicates a fair signal. If
the indicator does not illuminate, the Sensor/Transmitter is not providing a valid signal
for operation. Refer to “Solving Reception Problems” on page 10 before continuing.
Testing Control System Operation
To test the Wireless RainSensor operation with the irrigation system controller, acti-
vate a watering zone which is visible from the Sensor/Transmitter location.
Note: The manual activation cycle of some controllers bypasses the sensor inputs. If
the Receiver is connected to the controller’s sensor inputs, you will need to run an
automatic/timed watering program for these types of controllers.
With the sprinklers on, manually activate the Sensor/Transmitter by pressing and hold-
ing the Test Spindle. The sprinklers should shut off within a short time. If they do not
shut off, recheck the Receiver wiring connections at the controller. If the controller has
a sensor control or bypass switch, make sure the switch is set to the position that will
enable the sensor circuit to be active.
7
Figure 6
1/4"
1/2"
1"
3/4"
1/8"