


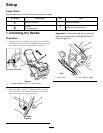

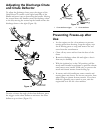
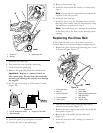


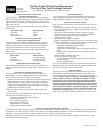

Figure 28
1. Brake spring (install on
idler arm here)
3. Engine pulley
2. Idler pulley 4. Rotor pulley
Note: Route the new drive belt rst around the
engine pulley, then the idler pulley, and nally around
the loose rotor pulley positioned just above the rotor
shaft (Figure 27).
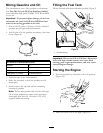
6. Install the rotor pulley onto the rotor shaft
(Figure 27).
7. Install the curved washer and the rotor pulley bolt
and tighten them securely (Figure 27).
Note: The concave side of the curved washer goes
against the outside of the pulley.
8. Install the brake spring onto the idler arm (Figure 28).
9. Install the drive belt cover with the bolts you
removed in step 1.
Note: Ensure that the drive belt is properly adjusted
and operating; refer to Checking the Control Cable
and Adjusting the Control Cable.
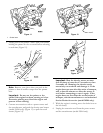
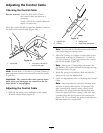
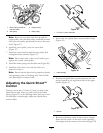
Adjusting the Quick Shoot™
Control
If there is more than 1/2 inch (13 mm) of slack in the
Quick Shoot cable when you pull on the lower cable
casing (Figure 29) or the discharge chute does not rotate
left and right in equal angles, adjust the Quick Shoot
control cables.
Figure 29
1. 1/2 inch (13 mm) maximum
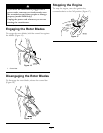
1. Loosen the two Quick Shoot control cable clamps
(Figure 30).
Figure 30
1. Cable clamps
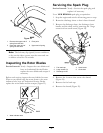
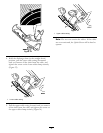
2. Position the Quick Shoot control between the two
arrows located on the right hand side of the upper
handle (Figure 31).
Figure 31
1. Arrows
3. Rotate the discharge chute so that it faces straight
ahead and the arrow on the back of the discharge
chute aligns with the arrow on the shroud (Figure 32).
15