


tanaka-usa.com 8 custsvc@tanaka-ism.com
Owner’s Manual
TS-720 E-Z Tiller™
4. Using E-Z Tiller For The First Time
a) With a firm grip on the handles, squeeze the throttle lever against the hand grip. As the tines make contact with the ground,
hold the unit back so that the tines begin to dig. If the tilling depth is not correct (too high or too low) the stabilizer bar may
be adjusted as follows:
b) Move the STOP switch to the OFF position and remove the spark plug cap. CAUTION: Never make any adjustments to the
stabilizer bar, engine, or tines while the engine is running.
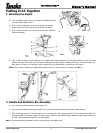
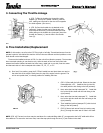
c) Remove the snap pin and clevis pin securing the stabilizer bar (see FIG. 9). Adjust the stabilizer bar up or down according to
the desired depth. NOTE: Move the stabilizer bar up for a more shallow cut or downward for a deeper cut. Reinstall the clevis
pin and secure with the snap pin.
d) Start the engine and recheck the depth.
If the depth is still unsuitable, repeat the above steps.
5. Tilling And Cultivating Hints
! Tilling is digging into, turning over, and breaking up hard-packed soil before planting. Cultivating is loosening the top layer of
soil, to kill weeds, aerate soil or mix in fertilizer. Loose soil is always preferable to hardpan, because it allows better root
growth by letting water and air reach the root systems. Both tilling and cultivating also bring unwanted materials (such as
stones and sticks) to the surface, where they're easily removed. At the same time, it enriches sod by chopping up vegetation
such as old roots and weeds.
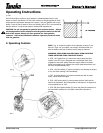
! The E-Z Tiller's stabilizer bar (located behind the tines) serves two purposes. First, it helps regulate the depth of the cut to a
uniform level. It also acts as a brake which helps you control the speed of the unit. Lowering the depth of the bar will slow
the tiner down, allowing you to dig deeper (tilling). Raising the stabilizer bar will allow you to make a faster, shallower cut
(cultivating).
! When using your E-Z Tiller for weeding, it is best to till no deeper than 1 ½”. Deeper tilling will only bring unwanted weed
seeds to the surface. For this application you may want to raise the stabilizer bar all the way up or remove it. This will allow a
faster, shallower cut. When cultivating in tight quarters, for instance between rows of vegetables, you may want to remove
the outside tines (see p. 7). This reduces the tilling width from 9" to 6”.
! The operator can control the tilling depth by holding back the E-Z Tiller (if the stabilizer bar is not used or the unit is not held,
it will "walk" across the surface).
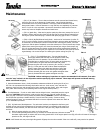
Charging The Battery
The E-Z Tiller has a built-in magneto that charges the battery as the engine runs.
However, if the E-Z Tiller isn't used for a long time the battery may require charging.
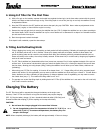
(FIG. 12) Plug the battery charger (1) into a household electrical outlet (120V Only) and
connect the electrical coupling (2) to the coupling on the stop switch body.
CAUTION:
1. Do not leave the charger plugged in for more than 24 hours.
2. Do not charge battery when the temperature is below 32 ° F (0° C) or
above 113° F (45° C). In extreme temperatures, the battery may not
accept a full charge.
NOTE: When completely discharged, the battery will take approximately 15 hours to charge.