


tanaka-usa.com 4 custsvc@tanaka-ism.com
Owner’s Manual
TS-720 E-Z Tiller™
Putting It All Together
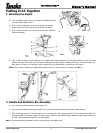
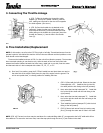
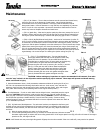
1. Mounting the Engine
a) (FIG. 1) Remove location bolt (2) and loosen shaft tightening bolt
(1) with the allen head wrench.
b) (FIG. 1) While holding engine over the shaft pipe, connect the
electrical coupling (3) from the wiring harness to the engine.
c) (FIG. 1) Place the dust cover (4) over the casing which holds the
electrical couplings.
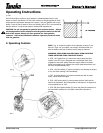
d) (FIG. 2) Slide the engine over the shaft pipe (1) and align the location bolt hole (2) in the casing with the hole (3) in the pipe.
Replace and tighten the location bolt (5) and the shaft tightening bolt (6) with an allen head wrench. If the engine does not
slide down far enough, rum it slightly in order to match the drive shaft splines (4) with those of the engine.
NOTE: When properly installed, the engine casing should be about 1”
from the top of the fender (see FIG. 3)
.
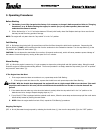
2. Handle and Stabilizer Bar Assembly
a) (FIG. 4) Remove handle lock bolt (1) and washer (2).
b)
(FIG
.
5) Extend handles to operating position. Line up lock bolt holes and install lock bolt and washer securely.
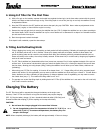
c) (FIG. 6) Remove snap pin (1) and clevis pin (2) from the lower part of the carrying handle. Turn the stabilizer bar 180° and
reinstall the clevis pin and the snap pin. There are three (3) holes in the stabilizer bar for different cutting depths. Refer to p.
9, under “Tilling and Cultivating Hints," for more details.
NOTE- The piece extending downward from the carrying handle is the stabilizer bar.