11
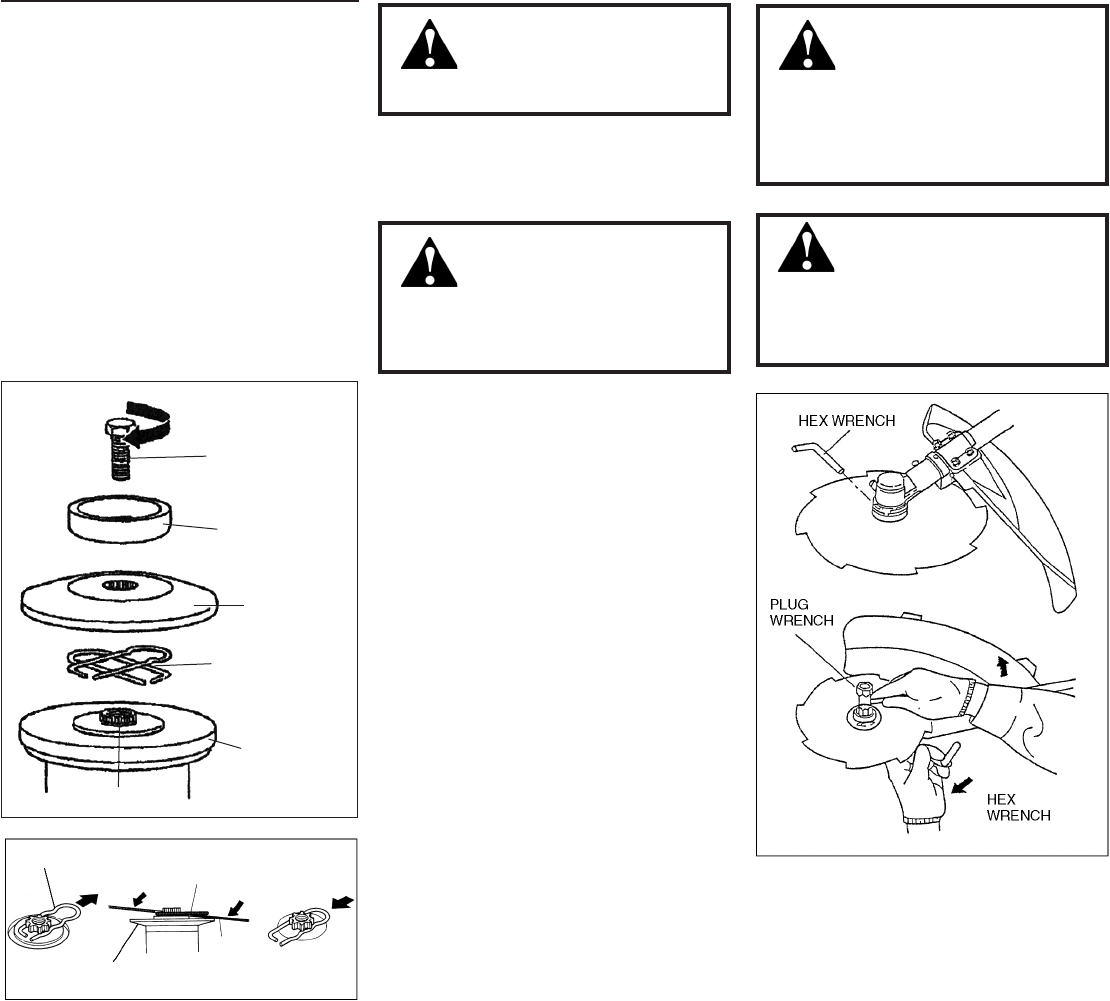
Installing a Blade
(1) Make sure the switch is off and
the engine is stopped.
(2) Wear gloves to protect your hands.
(3) Turn the unit over so the saw
holder ange extending from the gear
case is facing up.
(4) Using the small end of the plug
wrench, loosen the bolt (turn clock-
wise) and remove the bolt, bolt guard,
and holder B.
(5) Slide the safety clip as shown in
the illustration.
WARNING!
Before operating, make sure
the blade is securely mounted.
Turn the blade with your hand slightly
and make sure the blade turns smoothly
without wobbling.
WARNING!
The blade must t at. Make
sure the direction of the arrow
indicated on the blade corresponds
with the arrow indicated on the cutting
attachment shield.
(7) Put holder B and bolt guard back
and at this time only nger tighten
the bolt.
Make sure holder B is at against
the blade and the recess in holder B
must face the blade and completely
cover the safety clip.
(8) Rotate holder A until the hole in
its skirt aligns with the hole in the
gear case. Insert the hex wrench
through both holes (to prevent the
shaft from turning).
(9) Holding the hex wrench and blade
with one hand, tighten the bolt (turn
counterclockwise) securely using the
hex socket end of the plug wrench.
(10) Remove the hex wrench.
WARNING!
Never operate this machine
without the safety clip in
place.
(6) Fit the blade over the safety clip
onto holder A. Then, slide the safety
clip back to its original position.
WARNING!
The blade must t at against
holder A. The blade’s mounting
hole must be centered over the raised
boss of holder A.
SHAFT BOLT
BOLT GUARD
HOLDER B
SAFETY CLIPS
HOLDER A
GEAR SHAFT
HOOK
HOOK
RECEIVER
SAFETY CLIP
SAFETY CLIP
HOLDER A
BLADE


