


73
ENGLISH
EN
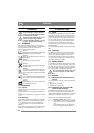
5.9.3 Removal/Installation
The battery is placed under the tank. To access the
battery, first dismantle the fuel tank as follows:
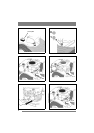
1. Open the engine casing.
2. Close the fuel cock, see 14.
3. Unscrew the two wing nuts (16:B) and remove
the clamps.
4. Carefully lift up the petrol tank.
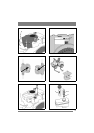
During removal/installation of the battery, the fol-
lowing applies regarding connection of the cables:
• During removal. First disconnect the black ca-
ble from the battery’s negative terminal (-).
Then disconnect the red cable from the battery’s
positive terminal (-).
• During installation. First connect the red cable
to the battery’s positive terminal (+). Then con-
nect the black cable to the battery’s negative ter-
minal (-).
If the cables are disconnected/connect-
ed in the wrong order, there is a risk of
a short-circuit and damage to the bat-
tery.
If the cables are interchanged, the gen-
erator and the battery will be damaged.
Tighten the cables securely. Loose ca-
bles can cause a fire.
The engine must never be driven with
the battery disconnected. There is a risk
of serious damage to the generator and
the electrical system.
When the battery has been rectified, install the fuel
tank as follows:
Check that the petrol hose is not
clamped against the hydraulic pump
and does not come into contact with
this. The hydraulic pump becomes very
hot during operation. Risk of fire.
1. Place the petrol tank on the brackets. Check that
the petrol hose is not touching the hydraulic
pump.
2. Install the clamps and tighten the wing nuts
(16:B).
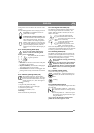
5.9.4 Cleaning
If the battery terminals are coated with oxide, they
should be cleaned. Clean the battery terminals with
a wire brush and lubricate them with terminal
grease.
5.10 Air filter, engine
5.10.1 Air filter (Pro16, Pro20)
The pre-filter (foam filter) must be cleaned/re-
placed after 25 hours of operation.
The air filter (paper filter) must be cleaned/re-
placed after 100 hours of operation.
NOTE! The filters should be cleaned/replaced
more often if the machine operates on dusty
ground.
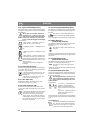
Remove/install the air filters as follows.
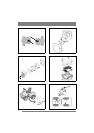
1. Clean carefully around the air filter cover.
2. Dismantle the air filter cover (26:A) by remov-
ing the two clamps.
3. Dismantle the filter assembly (26:B). The pre-
filter is placed over the air filter. Make sure that
no dirt gets into the carburettor. Clean the air fil-
ter housing.
4. Clean the paper filter by tapping it gently
against a flat surface. If the filter is very dirty,
replace it.
5. Clean the pre-filter. If the filter is very dirty, re-
place it.
6. Assemble in the reverse order.
Compressed air or petroleum-based solvents such
as kerosene may not be used for cleaning the paper
filter insert. This will damage the filter.
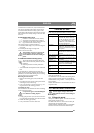
5.10.2 Air filter (Pro25)
The pre-filter (foam filter) must be cleaned after 25
hours of operation.
The air filter (paper filter) must be replaced after
100 hours of operation.
NOTE! The filters should be cleaned/replaced
more often if the machine operates on dusty
ground.
Remove/install the air filters as follows.
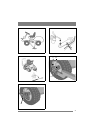
1. Clean carefully around the air filter cover.
2. Dismantle the air filter cover (27:A) by undoing
its screw (27:B).
3. Dismantle the filters. The pre-filter (27:C) is
placed over the air filter (27:D). Make sure that
no dirt gets into the carburettor. Clean the air fil-
ter housing.
4. Wash the pre-filter (27:C) in liquid detergent
and water. Squeeze dry. Pour a little oil on the
filter and squeeze in the oil.
5. Assemble in the reverse order. Check that the
rubber seal (27:E) is undamaged. Replace the
seal if necessary.