


ENGLISH
EN
8 MAINTENANCE
WARNING! Repairs must be carried out by the
dealer. Otherwise the warranty is not valid.
WARNING! The spark plug lead should be discon-
nected before carrying out repairs or maintenance.
8.1 PERIODIC MAINTENANCE
8.1.1 Before using the machine
• Check the oil level in the engine. Top up if necessary.
• Check that there is no oil leakage.
• Check that all the bolts are tightened.
8.1.2 After using the machine
• Clean the tiller.
• Check that there is no oil leakage.
8.1.3 Every 20 working hours
• Check, and clean or replace the air filter.
• Check that all nuts and bolts are tightened.
8.1.3 Change the oil in the engine every year.
8.2 TO DRAIN OFF THE PETROL
see section 2.4.
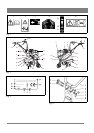
8.3 AIR FILTER, SEE FIG. 12
Clean/change the air filter regularly. Unscrew the screw (A)
to remove the air filter.
WARNING! Never use inflammable liquids when
cleaning.
Clean the air filter by brushing it clean with a soft brush.
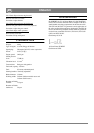
8.4 CHANGING/CHECKING THE OIL, SEE FIG. 2
The engine oil should be changed every year. Change the oil
as follows:
1. Run the engine warm. WARNING! The engine oil is hot.
Risk for burn injuries.
2. Tilt the machine forward and remove the plug (13).
Drain off the oil into a suitable container. Fit the plug
when the oil is drained off.
3. Put the machine horizontal.
4. Remove the plug (12) and fill up with 0.7 L of oil, SAE
10W40. Screw the plug back on.
5. The oil level should be level with the bottom edge of the
hole for the plug (12) when the machine is horizontal.
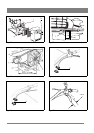
8.5 CLEANING
See section 2.4. First brush off all the loose dirt. Then wipe
the tiller with a damp cloth. The frame can be flushed clean
with water.
8.6 REPLACEMENT OF DRIVE BELT, SEE FIG 13
1. Remove the cover (16) in fig. 2.
2. Lift the tensioning pulley (2) and work off the belt.
3. Work off the belt from the two pulleys. The clamp (A)
over the small pulley should not be removed.
4. Fit the new belt in the reverse order.
5. Adjust the clutch wire. See below.
6. Fit the cover.
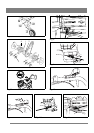
8.7 ADJUSTING THE CLUTCH WIRE
1. Remove the cover (16) in fig. 2.
2. Adjust the clutch wire with the tensioning sleeve (A) in
fig. 14.
3. The clutch wire is correctly adjusted when the spring (B)
in fig. 15 extends approx. 1 cm when the handle is pres-
sed in.
4. Lock the tensioning sleeve and fit the cover after adju-
sting.
8.8 ADJUSTING THE GEAR WIRE
1. Adjust the gear wire with the tensioning sleeve (C) in
fig. 16.
2. The gear wire is correctly adjusted when the play in the
end of the handle is approx. 5 mm. See fig. 17.
NOTE! Do not tighten the gear wire too hard. This can re-
duce its lifetime.
3. Lock the tensioning sleeve after adjusting.
8.9 TROUBLE SHOOTING
8.9.1 Fault: Difficult to start.
Reason: The fuel is too old.
Procedure: Drain the tank and fill up with new petrol.
Reason: Fault on spark plug.
Procedure: Replace spark plug.
8.9.2 Fault: The engine does not run smoothly.
Reason: Dirt in the fuel.
Procedure: Clean the petrol tank and carburettor.
Reason: Fault on spark plug.
Procedure: Replace spark plug.
8.9.3 Fault: The engine has no power, will not run at full
throttle.
Reason: Blocked air filter.
Procedure: Clean or replace air filter.