


ENGLISH
EN
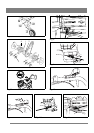
5.3 SUPPORT WHEEL, SEE FIG. 5
Fit the support wheel according to the figure. Do not tighten
the nut (5) too hard. It will not be possible to fold the wheel
arm up.
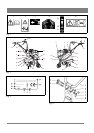
5.4 FILLING THE OIL, SEE FIG. 2
Remove the plug (12) and fill up with 0.7 L of oil, SAE
10W40. Screw the plug back on.
5.5 ROTORS AND SIDE ROLLERS, SEE FIG. 6
The first rotor (1) is pushed on the axle shaft (2) and locked
with the cotter (3). After which the second rotor (4) is inser-
ted in the first and locked with the cotter (3). Max. 3 rotors
can be fitted in this way on each side. Finally, fit the side rol-
lers in the same way.
WARNING! Check that the cotters are locked,
i.e. that the springs are locked round the shaft.
6 OPERATING
See also section 2.3.
WARNING! Check the engine's oil level. See sec-
tion 8.4.
6.1 FILLING THE FUEL, SEE FIG. 7
See the safety instructions in section 2.1. Fill up with 2.8 L
of unleaded petrol, and screw on the filler cap.
NOTE! Remember that standard unleaded petrol is perisha-
ble. Do not buy more petrol than what can be consumed in 30
days. Environmentally adapted petrol (acrylic petrol) can be
used to advantage. This petrol is more environmentally-fri-
endly.
6.2 START
See the safety instructions in section 2.3. A cold engine is
started as follows:
1. Open the petrol cock. See fig. 8.
2. Set the choke lever in the choke position. See fig. 11b.
3. Set the throttle control to idle. See fig. 10.
4. Pull the starter handle, first gently until the pawls grip,
and then with a strong tug until the engine starts. See (5)
in fig 2.
NOTE! Do not let go of the cord when the engine has
started, but follow it back slowly with your hand!
5. Set the throttle control in mid position.
6. Set the choke in position "Run". See fig 9. A warm engine
is started in the same way as above, but without steps 2
and 6.
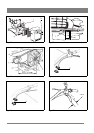
6.3 FORWARD OPERATION, SEE FIG. 2.
Forward gear is selected when the left handle, the gear con-
trol (2), is not pushed in. The tiller starts forward when the
clutch handle (1) is pulled in. Go forwards as follows:
1. Set the throttle control (10) in the required position.
2. Pull in the clutch handle (1). The tiller stops moving for-
ward when the clutch handle (1) is released.
6.4 BACKWARD OPERATION, SEE FIG. 2
WARNING! The gear control (2) must only be pul-
led in when the clutch handle (1) is not pulled in.
Go backwards as follows:
1. Set the throttle control (10) in the required position.
2. Pull in the gear control (2).
3. Pull in the clutch handle (1). The tiller stops moving
backwards when both handles are released.
6.5 STOPPING, SEE FIG. 11
Stop the tiller as follows: 1 Set the throttle control in stop po-
sition. See fig. 11a 2 Set the choke lever in choke position.
See fig. 11b. 3 Close the petrol cock. See fig. 11c.
6.6 OPERATING TIPS
The rotors drive the machine forward. The speed of the rotors
is regulated with the throttle control.
WARNING! Keep hands and feet away from the
rotors.
Adjust the number of rotors on each side to the required wor-
king width. See section 5.5.
When the machine is braked with the help of the tail brake,
the rotors dig down into the earth. The working depth de-
pends upon how much the tail brake is forced down into the
ground while working. The correct working depth determi-
nes how easily the work is done. The optimal working depth
varies with the ground conditions. Try it and see.
Never use the machine in wet soil. Lumps form, which are
then difficult to crush. Hard and dry soil necessitates making
a second run, at right angles to the first.
WARNING! Never overload a new machine. Run
the machine carefully the first 5 hours.
7 STORAGE
The tiller should be stored in a dry place.
See also section
2.4.
After the petrol has been drained off, start the engine and al-
low it to run until all the remaining petrol is used up.