


42
ENGLISH
GB
• Wear tightly fitting clothes and heavy-duty
shoes which completely cover the feet.
• The tank should only be half full when operat-
ing on slopes. Petrol can leak out.
• The engine must be stopped in the following
circumstances:
• When the machine is left unattended
• Before the machine is filled up with petrol
• Always make sure you have a good footing, es-
pecially on slopes.
• Check that no one is in front of you or beside
you when starting the blades. Keep a steady
grip on the steering. The machine will lift when
the rotors are started. Use extra caution when
backing.
• Always keep at a safe distance to the rotors
when working.
• Holding the steering correctly ensures a safe
distance.
• No person must come closer than 20 m to the
machine when working on slopes. The user
must hold the steering firmly with both hands
all the time.
• Working on stony or hard ground demands ex-
tra attention from the operator. The machine be-
comes more unstable.
• Never touch the engine when operating the ma-
chine, or just afterwards. Risk for burn injuries.
2.4 AFTER OPERATING
• Allow the engine to cool before putting the ma-
chine in a storeroom. Fire risk!
• Remove dirt and foreign material before putting
the machine in a storeroom. The area round the
petrol tank and muffler must be kept clean from
leaves, oil, petrol or other foreign materials.
Fire risk!
• If the petrol tank is to be emptied, do this out-
doors and when the engine is cold. Fire risk!
• The machine should be stored in a dry place.
The machine must not stored with fuel in the
tank in rooms where there are naked flames,
sparks or other strong sources of heat.
2.5 MAINTENANCE
• Carry out maintenance regularly. All nuts and
bolts should always be tight.
• Only use genuine spare parts which are in good
condition. Spare parts must not be repaired.
They must be replaced if they are defective.
Poor quality spare parts can lead to personal in-
jury. If the muffler is damaged it must be re-
placed.
• The engine must be stopped and the spark plug
lead disconnected in the following circumstanc-
es:
When adjusting the rotors.
When the machine is to be cleaned or repaired.
When checking after a collision with a solid
hard object. Carry out the necessary repairs be-
fore continuing to work.
If the machine begins to vibrate abnormally.
Carry out the necessary repairs before continu-
ing to work.
• Wear protective gloves when working with the
rotors.
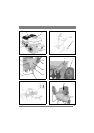
3 ASSEMBLY
3.1 Handle
Hold the handle in position over the machine’s
mounting beam and install as follows:
1. Install screw M8x65 (5:T) with washer and nut
in the upper hole.
2. Install a M8-screw (6:Z) on the left side,
through the cover (6:V), the handle’s circular
slit and screw it into the mounting beam.
3. Install an M8 screw with wire mounting (6:Y)
on the right side, through the cover (5:V), the
handle’s circular slit and screw it into the
mounting beam.
4. Set the handle to a comfortable working posi-
tion and tighten the screws.
5. Install the screw (5:U) in the cover’s front sec-
tion.
3.2 Auxiliary wheel
Install the auxiliary wheel (7:L) in the rear hole
and lock using the locking pin (7:T).
3.3 Cover
Install the cover (1:G) with the screws supplied
from underneath.
3.4 Throttle cable
1. Install the throttle cable on the engine if not al-
ready installed. See the engine supplier’s man-
ual.
2. Pull the cable up under the cover (1:G) and over
the handle’s screws.
3. Install the cable in the throttle. See fig. 7.