


8
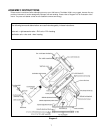
Before You Leave Home
Since most of us must set up our instruments in the dark, in the cold or while battling mosquitoes, a bit of preplanning and
organization is important. There are few simple things that can be accomplished in the comfort of your home before heading
outside.
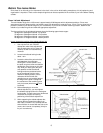
Gross Latitude Adjustment
The total latitude range of the 1200 mount is approximately 20-68 degrees with 4 adjustment positions. Since most
astronomers typically observe within one latitude range, this adjustment is made just once, if at all. Prior to shipment, we
preset the mount to your latitude range for your convenience. If you travel to another observing location, determine the
latitude of your observing site and make the appropriate adjustment.
The four positions for the altitude adjustments have the following approximate ranges:
55 degrees to 68 degrees latitude - top position
37 degrees to 59 degrees latitude - third position
28 degrees to 50 degrees latitude - second position
20 degrees to 37 degrees latitude - bottom position
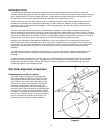
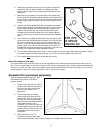
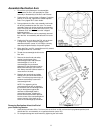
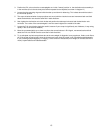
How to change the position of the altitude adjuster bar
1. Use only the R.A. axis. DO NOT
attempt the make these adjustments
with the declination axis in place and
certainly not with an instrument fully
mounted.
2. Loosen both altitude-locking knobs
about 1 turn.
3. Locate the side of the polar axis that
does not have the motor/gear
housing box. Loosen (about 1 turn)
the polar axis pivot screw and altitude
adjuster bar fixing screws on this side
only. With your hand, push the polar
axis upwards so that the altitude
locking knobs are positioned at the
top of the altitude slot (this is the
maximum altitude position). Some
resistance will be felt with this
operation as you are pushing against
the weight of the polar housing and
the resistance of the remaining polar
axis pivot screw (which has not
been
loosened).
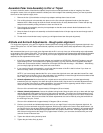
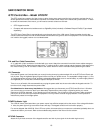
4. Before attempting to move the
altitude adjuster bar, you must tighten
the altitude-locking knob on the motor/gear
housing side. This will prevent any downward
movement of the polar axis during
positioning of the altitude adjuster bar.
5. While supporting the altitude adjuster bar,
remove the two screws that support it on
each side (4 screws in all), but keep the two
ends of the bar in contact with the side of the
mount, don't remove it completely (this tip is
for your convenience).
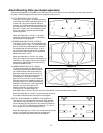
Diagram 3
Diagram 4