


17
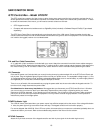
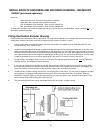
RS-232 Connectors
These serial port connections are used to connect your mount to your PC computer. You must provide your own straight-
through (non-crossing) cables with a 9-pin (DB9) male connector to interface with the GTO panel. We have provided the
locking posts to secure the cable firmly. If your serial cable does not have a 9-pin connector, you can use a gender changer
or adapter to convert it.
When you are controlling the position of the mount with a computer program such as DigitalSky Voice™ or TheSky™, the
microprocessor chip located in the servo drive box will send continual RA and Dec coordinate data via the cable
connections to your computer. When you use the software to give instructions to slew to a new object, the commands (RA
and Dec coordinates) are sent to the mount.
We provide two serial port connections on the mount so that you can use two software programs simultaneously. For
instance, you can give verbal commands in DigitalSky Voice while using TheSky as a planetarium program. Since the
mount will update the RA and Dec coordinates simultaneously, both programs are continually updated with the data from
the mount. You can watch the screen display of TheSky to see where your telescope is pointing as it slews. This is most
effective if you have a reasonably fast computer with plenty of RAM. If you try this with a 100MHz processor and only 32 MB
of RAM, the response time will be slow since both programs must be continuously updated with position data.
You must have two serial ports available on your computer to take use both serial ports simultaneously. If you use a laptop,
you may need to purchase a PCMCIA adapter to gain an additional serial port. Socket Communications offers adapters for
many computers. Check out their web site at www.socketcom.com.
If you have only one serial port available on your PC and wish to operate DigitalSky Voice and TheSky simultaneously, you
can use the Link Bridge feature of DigitalSky Voice. Please refer to the documentation provided with DigitalSky Voice and
our website for further information.
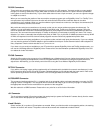
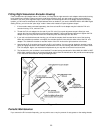
FOCUS Connector
Attach the 3.5mm phono plug connector of your JMI Motofocus or Meade electric focuser (optional accessories) here. Refer
to the section regarding focus adjustment in the GTO Keypad Manual for instructions on using the keypad controller to
adjust focus. Alternatively, you can verbally control the focus using the Focus Mode of DigitalSky Voice software.
RETICLE Connector
If you wish to use a plug-in type guiding eyepiece with an illuminated reticle (available from several manufacturers), insert
the 3.5mm phono plug into this connector for power. Reticle brightness can be adjusted with the hand control. Refer to the
section pertaining to reticle illuminator adjustment in the GTO Keypad Manual for further information.
AUTOGUIDER Connector
This connector interfaces with the RJ-11-4 modular jack of an autoguider cable, purchased separately or as part of a CCD
Imaging Camera or Autoguider. The autoguider will be functional and ready to go as soon as you plug it in. Please refer to
the appropriate manual from the manufacturer for operation of the autoguider.
We offer cables for all SBIG cameras. Please refer to our price list or call for further information.
+6V Connector
This 6-volt output accepts 3.5mm phono plugs. It is used primarily to power the Pentax 6x7 camera directly from the mount
with a cord sold for that purpose (our part # CORD01).
N and S Switch
Select northern (N) or southern (S) hemisphere as needed. When you slide the switch to the opposite position, the tracking
direction of the drive will reverse. The power cord must be removed and re-attached to make this work.