


www.snapper.com14
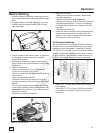
Mulching Operation
For best mulching results, cut up to a maximum of 1/3
of grass blade length and recycle ONLY when grass is
dry.
1. Set all wheels in the highest cutting position (Notch
7). Refer to the Section entitled “Cutting Height
Adjustment”.
2. Move the engine speed control to the fast (Rabbit)
position.
3. Move the ground speed control to the slowest
speed setting.
4. Proceed mowing slowly. If the grass is very dense,
lower each rear wheel latch one notch lower than
the front wheel latches to improve mulching perfor-
mance.
NOTE: The mulching cover should remain on the
machine at all times, unless alternate discharge opera-
tions are desired, such as side discharging or bagging.
Removing the Mulching Cover
(Optional Accessory on Some Models)
WARNING
DO NOT attempt any maintenance, adjustments or
service with engine and blade running. STOP engine
and blade. Disconnect spark plug wire and secure
away from spark plug. Engine and components are
HOT. Avoid serious burns, allow sufficient time for all
components to cool.
!
!
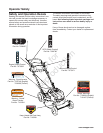
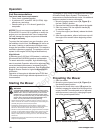
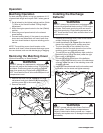
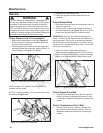
1. Remove the knob nuts (A, Figure 8) and inter-
nal/external tooth lock washers (B) securing the
mulching cover (C) to the mower deck.
2. Remove the cover.
Figure 8: Removing the mulching cover
A
C
B
Installing the Discharge
Deflector
WARNING
DO NOT attempt any maintenance, adjustments or
service with engine and blade running. STOP engine
and blade. Disconnect spark plug wire and secure
away from spark plug. Engine and components are
HOT. Avoid serious burns, allow sufficient time for all
components to cool.
!
!
1. Remove the mulching cover. Refer to the Section
entitled “Mulching Operation”.
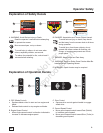
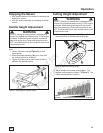
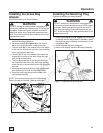
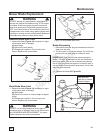
2. Install the deflector (A, Figure 9) to the deck in
place of the mulching cover, making sure that:
• The front hole (B) on the outside front of the
deflector fits over the stud where the front of the
mulching cover was originally secured;
• The slot (C) on top of the deflector slips under the
restraining nut on top of the deck (under the right
front corner of the engine);
• The slot (D) on the inside rear of the deflector
slips onto the stud behind the rear of the discharge
opening, where the rear of the mulching cover was
originally secured.
3. Install the internal/external tooth lock washers and
knob nuts onto the studs and tighten securely.
Figure 9: Installing the discharge deflector
B
A
C
D
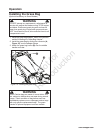
WARNING
DO NOT operate without entire Grass Catcher or
guard in place. Grass Catcher components are
subject to deterioration during normal use. Inspect
frequently and replace worn or damaged components
immediately.
!
!
Operation
Not for
Reproduction