


26
www.SnapperPro.com
Regular Maintenance
Servicing The Mower Blades
Removing the Mower Blade
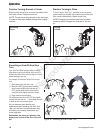
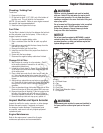
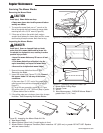
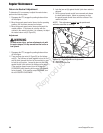
1. To remove the mower blade, use a 1” wrench on the
flats of the spindle shaft and remove the mower blade
mounting bolt with a 15/16” wrench (Figure 26).
2. If there are no flats on the spindle shaft, wedge a
wooden block between the mower blade and the mower
deck housing to keep the mower blade from turning.
Inspecting the Mower Blades
1. Remove the mower blade from the unit. See
Removing the Blade.
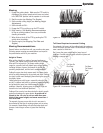
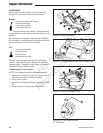
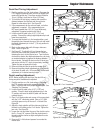
2. Inspect the mower blade (Figures 27 & 28). Discard
the mower blade if it has any of the below
conditions.
A.) Has more than .5” (12,7 mm) of the mower blade
metal removed from previous sharpening or wear (D,
Figure 27).
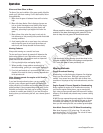
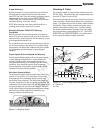
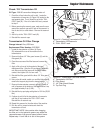
B.) The air lifts are excessively eroded (B & C, Figure
28) and the notch (C) is .25” (6,35 mm) deep or greater.
C.) Mower blade is bent or broken.
3. If the cutting edges are not sharp or have nicks, sharpen
the blades. See Sharpening the Mower Blades.
Figure 26. Loosening the Mower Blade for Removal
CAUTION
Avoid injury! Mower blades are sharp.
• Always wear gloves when handling mower blades or
working near blades.
DANGER
Avoid injury! A worn or damaged blade can break,
and a piece of the mower blade could be thrown into
the operator’s or bystander’s area, resulting in serious
personal injury or death.
• Inspect the mower blade every 25 hours or at least
once a year.
• If the mower blade hits a solid object, stop the
engine immediately and inspect the mower blade.
• Never weld or straighten bent mower blades.
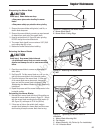
Figure 27. Inspecting the Mower Blade Tips
A. Mower Blade Cutting Edge
B. Square Corner
C. Air Lift
D. Wear Measurement - DISCARD Mower Blade If
greater than .5” (12,7 mm)
B
D
A
B
C
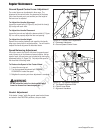
Figure 28. inspecting the Mower Blade Air Lifts
A. New Mower Blade
B. Mower Blade at Wear Limit (A notch begins to form)
C. Mower Blade in Dangerous Condition (Notch measures .25” (6,35 mm) or greater DO NOT USE. Replace
with new mower blade.)
C
A
C
A
Not for
Reproduction