


17
Troubleshooting, Adjustments, & Service
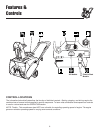
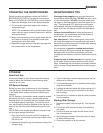
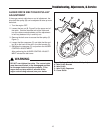
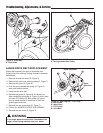
Figure 11. Auger Flites
A. Auger
B. Flite Shoe
C. Self-Tapping Screws
AUGER FLITE SHOE REPLACEMENT
Inspect the flite shoes frequently for signs of excessive
wear. Visually check flite shoes for cracking, fraying,
and severed or exposed belts.
1. Turn the engine OFF, remove the key, disconnect the
spark plug wire, and wait for all moving parts to stop.
2. Tilt the unit backward to access the auger. Secure
the unit in the tilted position.
3. Remove all the self-tapping screws (C, Figure 11)
securing the flite shoes to the auger. Retain the
screws, discard the old flite shoes (B).
4. Secure the new flite shoes to the auger using the
original self-tapping screws. Be careful not to strip
the screws. Be sure the angled ends of the flite shoe
are aligned with the angled ends of the auger.
A
B
C
Align
Angled
Ends