


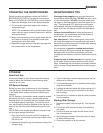
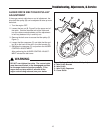
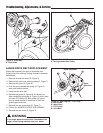

Figure 10. Belt Diagram - PTO Pulley
A. Belt Guide
B. Idler Pulley
C. PTO Pulley
D. Drive Belt
O
F
F
O
F
F
16
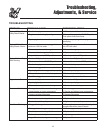
Troubleshooting, Adjustments, & Service
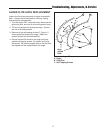
AUGER DRIVE BELT REPLACEMENT
Inspect belt frequently for signs of excessive wear.
Visually check for cracking, fraying, severed or exposed
belt strands.
1. Remove the side belt cover (D, Figure 3).
2. Remove both belt cover retaining studs (D, Figure 7).
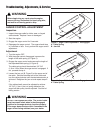
3. Remove belt guide (A, Figure 8)
4. Push the spring-loaded idler pulley (A, Figure 9)
down and remove the belt.
5. Install the new drive belt.
6. Reinstall belt guide (A, Figures 8,10). Make sure
when reinstalling belt guide (A, Figure 10) that it does
not touch PTO pulley (C). Belt guides (A) should
have an equal amount of clearance on both belt
guide fingers as shown.
7. Reinstall the side cover studs (D, Figure 7).
8. Perform the AUGER CONTROL ADJUSTMENT.
9. Reinstall the side cover (D, Figure 3).
Figure 8. Drive Belt
A. Belt Guide
Figure 9. Drive Belt Bracket
A. Spring-Loaded Idler Pulley
A
A
B
C
A
D
Equal Clearance
Equal
Clearance
If the auger does not stop within 5 seconds of the
auger control being released, see your dealer.
WARNING