


10
Operation
STARTING THE ENGINE
NOTE: The snowthrower engine is designed to operate
at cold temperatures. Avoid operating the snowthrower if
air temperature is 40° F or warmer. Engine will be diffi-
cult to start in warm weather.
1. Insert engine key into the switch and turn key (B,
Figure 2) to the ON position. Make sure the auger
control is in the released OFF position.
2. If engine is cold, move choke control lever (C) to the
ON position. Do not choke a warm engine.
3. Push the primer button (A) three times if engine is
cold. Do not prime a warm engine.
ELECTRIC START MODELS:
4. Plug the power cord supplied into the starter recepta-
cle first, then plug into a 120Volt AC household out-
let. DO NOT use an extension cord. Push the starter
button (E) to crank engine. Release the start button
when the engine starts. DO NOT crank engine for
more than a total of 15 seconds without allowing
electric starter to cool for 10 minutes. NOTE: Do not
push primer button (A) while engine is being
cranked.
5. Gradually move choke lever (C) to the OFF position.
6. Disconnect power cord from household recepta-
cle FIRST, and then from starter switch on the
snowthrower.
MANUAL (RECOIL) START MODELS
4. Pull the recoil starter (D) rope out rapidly to start the
engine. Let the rope return slowly to the starter. If the
engine does not start after three pulls, push the
primer bulb once, and again pull starter rope.
5. Gradually move choke lever (C) to the OFF position.
6. Allow engine to warm up before beginning
snowthrower operations. The engine will operate at
full throttle when thoroughly warmed up.
Electric start precautions:
• Use only with a polarized 120V AC outlet. Do
not modify the plug to fit into any other type of
outlet.
• Use only the power cord supplied with the unit.
DO NOT use a damaged cord.
• Be sure there is no moisture present on the
cord ends or receptacles when connecting to
an outlet or to the unit.
WARNING
STOPPING THE ENGINE
1. Release the Auger Control.
2. Turn Engine Key (B, Figure 2) to the OFF position.
3. Remove the key from the switch if you are leaving the
operating position or will be making adjustments or
repairs. (NOTE: Allow the unit to cool before storing
or making any adjustments or repairs.)
If you will be storing the unit for the season, see the
STORAGE section for instructions on properly preparing
the unit for long-term storage.
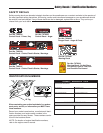
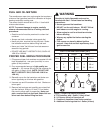
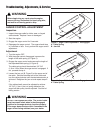
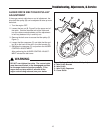
Figure 2. Engine Controls
A. Primer
B. Ignition (Key) Switch
C. Choke Control
D. Recoil Starter
E. Electric Starter Switch
A
B
C
D
E