


MAINTENANCE
2407TL 01/11 Maintenance Section 5-7
© 2011 Alamo Group Inc.
MAINTENANCE
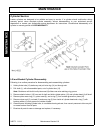
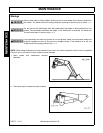
Lift and Bucket Cylinder Reassembly
Note: Be careful not to damage seals and o-rings on edges or holes in cylinder tube. Inspect and remove burrs
and sharp edges if necessary before reassembly.
1. Place rod seal (3) into groove inside cylinder head.
Note: Lips of seal (3) must be face inward and seal must be firmly seated in groove.
2. Install wiper seal (2) with lip of seal facing out and flush with top of cylinder head (5). Install wear ring (4)
inside other end of head (5).
3. Place o-ring (7) with back-up washer (6) in groove on outside of head. Back-up washer must be on rod
side.
4. Remove sharp edges on outer edge of the threaded end of shaft (1). Lubricate wiper seal (2) and rod seal
(3) in head and carefully slide head onto shaft.
5. Place o-ring (10), piston seal (11) and piston wear ring (8) in grooves on outside of piston (9).
Note: For easier installation, place piston seal (11) in 120°F water to warm seal.
6. Slide piston (9) onto threaded end of shaft and install lock nut (12). Tighten lock nut to 100 lbs.
7. Lubricate piston wear ring (8) and piston seal (11) on piston, o-ring (7) and backup washer (6) on head and
inside of cylinder tube (13), then carefully slide piston and head into cylinder tube (13).
8. Insert wire retaining ring (14) into slot in cylinder tube (13). Apply pressure to wire ring to thread it into
groove while turning cylinder head.
Note: If cylinder has a countersunk hole, hook end of retaining wire into hole and turn cylinder head 1-1/2
turns to secure wire. End of hook may need to be ground to fit in countersunk hole.