


17
WINTER USE AND CARE
The hydrotherapy spa is designed for year-round use.
If you decide to store the hydrotherapy spa for the
winter, store it in a warm, dry location. Follow the
steps below to winterize the hydrotherapy spa.
1. Drain the spa (see DRAINING THE
HYDROTHERAPY SPA on page 16).
2. Remove all remaining water from the spa shell.
Dry the spa shell with towels.
3. Set the air control on the console to the lowest
setting. Use a wet/dry vacuum to pull any remain-
ing water from the system. To do this, place the
vacuum nozzle over each thera-jet, starting with
the highest jet and finishing with the lowest one.
4. Set the air control on the console to the highest
setting and repeat step 3.
5. Drain the pump (see DRAINING THE PUMP on
page 16). Once the water has drained from the
pump, place the vacuum nozzle over the
drainage hole in the pump and vacuum any addi-
tional water from the pump. Note: For additional
protection you can remove the pump/motor
from the spa to store it in a climate controlled
room.
6. Clean the spa shell (see page 14).
7. Clean the filter (see this page).
8. Re-attach the access cover.
9. Re-attach the spa cover.
CONVERTING THE SPA TO A 240 VOLT
POWER SOURCE
The hydrotherapy spa is designed to operate with
either a 120v power source or a 240v power source.
For your convenience, the spa is shipped ready to
accept a 120v power source. However, you can great-
ly improve the performance of the spa by converting
the spa’s power supply to receive power from a 240v
power source. If the spa is converted, it must be wired
directly into an approved 240v GFCI in your home by
a licensed, qualified electrician in accordance with all
local, state, and national electrical codes.
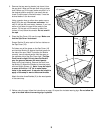
CHECKING AND CLEANING THE FILTER
The filter should be checked periodically for build-up
of dirt and oil. To check or clean the filter, it is neces-
sary to remove the basket and the two filter car-
tridges from the filter housing.
Removing and Cleaning the Basket:
1. Turn off the power.
2. Locate the filter housing in one corner of the spa.
Grip the tab on the filter door and pull it open.
3. Reach into the basket with four fingers and pull
the basket towards you until it snaps free.
4. Lift the basket out of the filter housing by pulling
on the handle on the far side and turning the bas-
ket towards you.
5. Clean the basket by spraying it with a garden
hose or holding it under a faucet. Note: Avoid
hitting the basket against objects to clean it,
since this may break the basket.
6. Put the basket back into the housing and press it
down until it snaps into place.
7. Close the filter door.
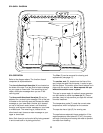
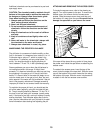
Removing and Cleaning the Filter Cartridges:
1. Follow steps 1 through 4 at the left to remove the
basket.
2. Reach into the housing and locate the plastic
diverter on top of the filter cartridges. Rotate the
valve on the diverter until it is fully open.
3. Stick two fingers into the holes in the diverter and
lift the diverter and the upper filter cartridge
directly upwards until the edge of the diverter
clears the housing. Then, tip the diverter towards
yourself and pull it out. Note: If the diverter
comes off the filter cartridge, reach into the hous-
ing and lift out the upper filter cartridge.
4. Lift the lower filter cartridge out of the housing.
5. Clean the filter cartridges with a garden hose or
under a faucet. Spray each pleat from top to bot-
tom. Note: To avoid damaging the filter car-
tridges, do not use a brush to clean them.
6. To remove body oils or sun tan lotions, soak the
filter cartridges in a cleaning solution purchased
from a pool and spa supply store.
7. Inspect the filter cartridges for damage. Replace
the filter cartridges if there is any sign of damage.
8. Put one filter cartridge back into the housing.
9. Push the tube on the diverter into the other filter
cartridge as far as it will go. Put the other filter
cartridge into the housing.
10. Put the basket back into the housing and press it
down until it snaps into place. Close the filter door.
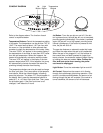
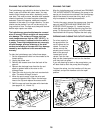
ADJUSTING THE FILTER DIVERTER
The diverter regulates the flow of water to the filter in
order to make the pump run smoothly. Open the
diverter fully to begin with. If the pump runs smoothly,
no further adjustment is necessary.
If the pump begins to cavitate (if you hear a “cracking”
sound or if the speed of the pump surges up then
slows down repeatedly), turn the valve slightly to
reduce the water flow. Keep adjusting the valve in
small increments until the pump runs smoothly.