


36
CILINDRO
1. Remueva la bujía.
2. Vacíe 29 ml (una onza) de aceite a través
del agujero de la bujía en el cilindro.
3. Tire la manilla de arranque lentamente unas
cuantas veces para distribuir el aceite.
4. Cambie por una bujía nueva.
OTROS
• No guarde la gasolina de una temporada a la
otra.
• Cambie el envase de la gasolina si se emp-
ieza a oxidar. La oxidación y/o la mugre en
su gasolina producirán problemas.
• Si es posible, guarde su unidad en un recinto
cerrado y cúbrala para protegerla contra el
polvo y la mugre.
• Cubra su unidad con un forro protector
adecuado que no retenga la humedad. No
use plástico. El plástico no puede respirar, lo
que permite la formación de condensación,
lo que producirá la oxidación de su unidad.
IMPORTANTE: Nunca cubra la segadora mien-
tras el motor y las areas de escape to davia
estan calientes.
PRECAUCIÓN: Nunca almacene la sega-
dora con gasolina en el estanque dentro de un
edifi cio en donde los gases pueden alcanzar
una llama expuesta o una chispa. Permita que
se enfríe el motor antes de alma-cenarla en
algún recinto cerrado.
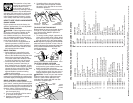
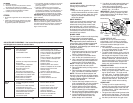
No arranca 1. Filtro de aire sucio. 1. Limpie/cambie el fi ltro de aire.
2. Sin combustible. 2. Llene el estanque de combustible.
3. Combustible rancio. 3. Drene el estanque de combustible
y vuelva a llenar el estanque con
gasolina nueva.
4. Agua en el combustible. 4. Drene el estanque de combustible
y vuelva a llenar el estanque con
gasolina nueva.
5. Alambre de la bujía desconectado. 5. Conecte el alambre a la bujía.
6. Bujía mala. 6. Cambie la bujía.
7. Cuchilla suelta o adaptador 7. Apriete el perno de la cuchilla
de la cuchilla quebrado. cambie el adaptador de la cuchilla.
8. Barra de control en la 8. Presione la barra de control
posición suelta. hacia el mango.
9. Barra de control defectuosa. 9. Cambie la barra de control.
10. Válvula del combustible (si equ- 10. Gire a la válvula del combustible
ipada) está en la posición OFF. a la posición ON.
11. Batería débi (si equipada). 11. Cague la batería.
12. Desconecte el conector 12. Conecte la batería al motor.
de la batería (si equipada).
Falta de 1. Cuchilla desgastada, doblada 1. Eleve la altura de corte.
fuerza o suelta.
2. Altura de las ruedas dispareja. 2. Eleve la altura de corte.
3. Velocidad del motor lenta. 3. Limpie/cambie el fi ltro de aire.
4. Acumulación de césped, hojas o 4. Limpie la parte inferior de la
basura debajo de la segadora. caja de la segadora.
5. Demasiado aceite en motor. 5. Revise el nivel del aceite.
6. Velocidad de recorrido 6. Corte a una velocidad de
demasiado rápida. recorrido más lenta.
PROBLEMA CAUSA CORRECCIÓN
SOLUCIÓN DE PROBLEMAS - Vea la sección apropiada en el manual amenos que
esté dirigido a un centro de servico Sears.
13
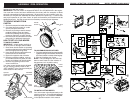
LAWN MOWER
Always observe safety rules when per-
form ing any main te nance.
TIRES
• Keep tires free of gasoline, oil, or insect
control chemi cals which can harm rubber.
• Avoid stumps, stones, deep ruts, sharp
objects and other hazards that may
cause tire damage.
DRIVE WHEELS
Check rear drive wheels each time you
mow to be sure they move freely. The
wheels not turning freely means trash,
grass cuttings, etc., may be inside the
drive wheel and dust cover area and must
be cleaned out to free drive wheels.
If necessary to clean the drive wheels,
check both rear wheels.
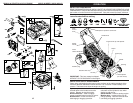
BLADE CARE
For best results, blade must be kept sharp.
Re place a bent or dam aged blade.
CAUTION: Use only a replacement
blade approved by the manufacturer of
your mower. Using a blade not approved
by the manufacturer of your mower is
hazardous, could damage your mower and
void your warranty.
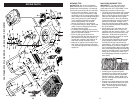
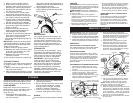
TO REMOVE BLADE
1. Disconnect spark plug wire from spark
plug and place wire where it cannot
come in contact with plug.
2. Turn lawn mower on its side. Make
sure air fi lter and carburetor are up.
3. Use a wood block between blade and
mower hous ing to prevent blade from
turning when re mov ing blade bolt.
NOTE: Protect your hands with gloves
and/or wrap blade with heavy cloth.
4. Remove blade bolt by turning counter-
clockwise.
5. Remove blade and attaching hard ware
(bolt, lock wash er, hardened wash er).
NOTE: Remove the blade adapter and
check the key inside hub of blade adapter.
The key must be in good con di tion to work
properly. Replace adapter if damaged.
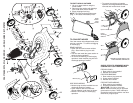
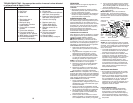
TO REPLACE BLADE
1. Position the blade adapter on the en-
gine crank shaft. Be sure key in adapter
and crankshaft keyway are aligned.
2. Position blade on the blade adapter
aligning the two (2) holes in the blade
with the raised lugs on the adapter.
3. Be sure the trailing edge of blade (oppo-
site sharp edge) is up toward the engine.
4. Install the blade bolt with the lock
washer and hardened washer into
blade adapter and crankshaft.
5. Use block of wood between blade and
lawn mower housing and tighten the
blade bolt, turning clockwise.
• The recommended tightening torque is
35-40 ft. lbs. / 47-54 N-m.
IMPORTANT: Blade bolt is heat treated.
If bolt needs replacing, replace only with
approved bolt shown in the Repair Parts
section of this manual.
TO SHARPEN BLADE
NOTE: We do not recommend sharp-
en ing blade - but if you do, be sure the
blade is balanced. An un bal anced blade
will cause eventual damage to lawn
mower or engine.
• The blade can be sharp ened with a fi le
or on a grinding wheel. Do not attempt
to sharpen while on the mower.
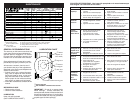
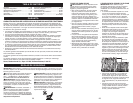
• To check blade balance, drive a nail into
a beam or wall. Leave about one inch of
the straight nail ex posed. Place center
hole of blade over the head of the nail.
If blade is balanced, it should remain in
a horizontal position. If either end of the
blade moves downward, sharpen the
heavy end until the blade is balanced.
GRASS CATCHER
• The grass catcher may be hosed with
water, but must be dry when used.
• Check your grass catcher often for dam-
age or de te ri o ra tion. Through normal
use it will wear. If catcher needs replac-
ing, replace only with ap proved replace-
ment catcher shown in the Repair Parts
section of this manual. Give the lawn
mower model number when ordering.
GEAR CASE
• To keep your drive system working
properly, the gear case and area around
the drive should be kept clean and free
of trash build-up. Clean under the drive
cover twice a season.
• The gear case is fi lled with lubricant to the
proper level at the factory. The only time
the lubricant needs attention is if service
has been performed on the gear case.
Blade
bolt
Crankshaft
keyway
Hardened
washer
Lockwasher
Blade adapter Key
Blade
Trailing edge
Crankshaft