


E
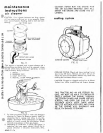
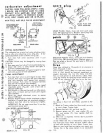
FIG.4
FIG.5
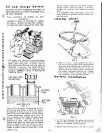
4.
Place
battery
(C)
In
piastic
tray
(B)
with
battery
termina
Is
to
rear
af
tractar
as
shawn.
5.
Assemble
battery
clamp
(D~
to
one,of
the
two
(2)
battery
bolts
(E)
with
a
5;16
x
3.4
flat
washer,
and
wing
nut
above
clamp
as
shown.
Hook
lower
end
of
battery
bolt
in
slot
in
side
of
battery
sup-
port
a s
shown.
Place
c lamp
across
top
of
battery,
and
secure
other
battery
bolt
to
battery
support
and
clamp
with
other
flat
washer,
and
wing
nut.
Tighten
winq
nuts
securely.
6.
Connect
cable
and
cover
(F)
Fig.
5 to
plus
(+)
term
i
na
I
battery.
Secure
with
14
hex
nut
found
in
plastic
bag.
Tighten
nut
securely.
7.
Connect
ground
cable
(G)
(Fig.
5) to
negative
(--)
terminal
of
battery.
Secure
with
other
14
hex
nut
found
in
plastic
bag.
Tighten
hex
nut
securely.
4824R·7.J,;
74
c
G
- 5 -
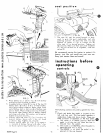
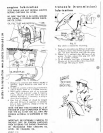
seat
position
1.
The
seat
(A), may
be
moved
forward,
or
back-
ward,
to
give
the
most
comfortable,
and
safe
operating
position.
To
move
the
seat,
tip
seat
forward,
as
shown
in
Fig.
6.
Loosen
nut
(B)
slide
seat
(A)
to
desired
position.
Tighten
nut
(B)
securely.
Make
sure
that
seat
plate
weldment
(C),
has
not
twisted
out
of
alignment,
with
seat
spring
(D).
We
recommend
wax
i ng
the
tractor
to
protect
it's
beauty,
just
like
you
would
wax
your
new
car.
Keep
your
tractor
clean
and
waxed.
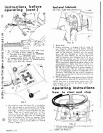
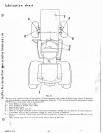
instructions
operating
controls
FIG.7
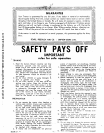
before
The
following
controls
are
used
to
operate
the
Trac-
tor:
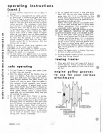
1.
Clutch
and
brake
foot
pedal
is
located
on
the
left
side
foot
rest.
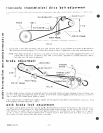
The
foot
pedal
operates
a
combination
brake
and
drive
clutch.
There
are
three
positions
of
operation
on
the
foot
pedal.
a.
The
clutch
is
in
DRIVE
position
when
the
pedal
is
all
the
way
out
(when
the
foot
is
removed
from
the
pedal).
b.
The
clutch
is
in
NEUTRAL
when
the
pedal
is
depressed
half
way
or
more.
c.
The
BRAKE
is
on
when
the
pedal
is
de-
pressed
all
the
way
forward.
another free manual from www.searstractormanuals.com