


fill
and
charge
battery
CAUTION:
DO
NOT
ASSEMBLE
BATTERY
TO
TRACTOR
UNTIL BATTERY
HAS
BEEN
FILL-
ED
AND
CHARGED.
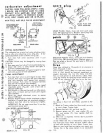
FILL
BATTERY
AS
SHOWN
DO
NOT
OVERFI
LL---
CORRECT
LEVEL
IS
BOTTOM
OF
TUBES
IN
CELLS. -
OVER
FILLING
WILL
RESULT
IN
WIRE
OR
PAINT
DAMAGE
ON
TRACTOR.
1.
Fill
battery
with
electrolyte
and
charge
battery
as
out
I ined
in
instructions
in
battery
container.
NOTE: After
filling
cells,
let
battery
stand
for
thirty
(30)
minutes.
Recheck
acid
level,
add more
electrolyte
if
necessary,
then
charge
battery
at
a
rate
not
exceeding
three
(3)
amperes
for
about
2Y2
hours.
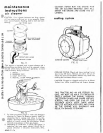
CORRECT
LEVEL
IS
BOTTOM
OF
TUB
ES
IN
CELLS.
CUT-AWAY
VIEW
OF
BATTERY
~"-BATTERY
.........
_--_
..........
-
------
-------
------
----------
..........
TUBE
--
-
----
------
--------....-
--------
---....
..........
..-...
-...",--
~--
..........
---
-..-----
--
---
-::
_:.,
~
Z
,:::-~~
~
BATTERY
CELL
ELECTROLYTE
FIG.
1
There
will
be
an amount
of
electrolyte
(acid)
in
the
container
after
battery
is
filled.
This
should
be
disposed
of
and
not
u
sed
at
a I
ater
date
to
refill
Tr()ctoror
any
other
battery.
Using
a common
5
gallon
polyethylene
garbage
can
or
pail,
fill
with a minimum
of
four
inches
of
water.
Avoid
spillage
on
person
or
clothing,
add
left
over
electrolyte
to
water.
Then
sod
i
um
b-i
carbonate
(baking
soda)
shou
Id
be
added
and
the
mixture
stirred
or
agitated
until
the
addition
of
bicar
.
bonate
no longer
causes
foaming.
Agitate
with a
wooden or
plastic
stake
or
stick
only.
It will
4824R-7.
1.74
- 4 -
now be
safe
to
dispose
of
this
down a
regular
sewage
system.
Since
the
product
is
well
neu-
tralized,
no
criticism
from
authorities
should
result.
It
is
preferable,
where
permissible,
to burn
the
empty
acid
pack
to
prevent
possible
further
con-
tact
with
acid.
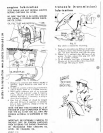
steering
wheel
~
(S
®
I
FIG.2
1.
Refer
to Fi
g.
2.
Insert
woodruff key (C)
in
key way
ot
steering
shaft.
Slide
steering
wheel
down
over
steering
shaft
and woodruff
key.
Im-
portant
: Be
sure
woodruff key is in
place
in
steering
shaft
and
steering
wheel.
Secure
with
flat
washer,
lockwasher
and
hex
bolt.
Tighten
bolt
securely.
Press
steering
wheel
cap
(D)
b a
tt°,;;s;ion
i"nc;n;e~
0;
Is~e;ii~
w~eel.
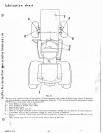
FIG.3
1.
To
lift hood
assembly
(A),
grasp
each
side
of
hood
at
rear
and pull
outword
and upward.
Lift
hood to
its
extreme
forward
position.
2.
Remove
tape
holding
plastic
tray
(B)
in
tractor.
another free manual from www.searstractormanuals.com