


13
ASSEMBLINGTHEDECKADAPTER(#62468)
TO THE MOWER DECK
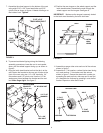
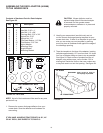
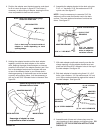
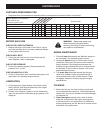
ContentsofHardwarePackforDeckAdapter:
See Figure 23.
Key Qty. Description
A 2 Hex Bolt, 5/16" x 1"
B 4 Hex Bolt, 1/4" x 3/4"
C 2 Carriage Bolt, 5/16" x 3/4"
D 3 Nylock Nut, 5/16"
E 4 Nylock Nut, 1/4"
F 3 Flat Steel Washer, 1/4" Std.
G 12 Flat Washer, 5/16" Std.
H 5 Nylon Washer
I 1 Mounting Strap
J 1 Angle Bracket
K 1 Mounting Bracket
NOTE: Not all of the hardware will be used for any one
particulartup.
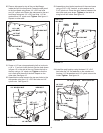
1. Removethemowerdischargedeectorfromyour
mowerdeck.Savethedeectorandhardwarefor
remounting.
I
J
K
A B C
E
D
H
G
F
NOT SHOWN FULL SIZE
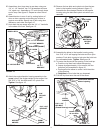
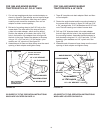
IFYOUHAVEAMURRAYTRACTORWITHA38",40"
OR46"DECK,SKIPDIRECTLYTOPAGE15.
2. Identify your mower deck (see fold outs) and cut
out the correct discharge opening template for your
mowerdecksize.Ifthereisnotemplateforyourdeck
sizeyoucanmakeyourowntemplatebymarking
around a piece of cardboard held against the edge of
the discharge opening.
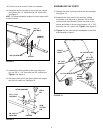
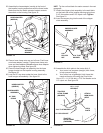
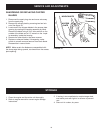
3. Tape the template to the face of the adapter, locating
template approximately 1/2" from front and 1/4" down
from top of adapter. Keep as close to top as possible.
Seegure24.Markoutlineoftemplateonfaceof
adapter using white crayon, nail or scriber. Drill a
starting hole inside the outline, then use a saber saw
orkeyholesawtocutouttheopening.Seegure24.
FIGURE 24
CAUTION: Mowerdeectormustbe
replaced when Mow-N-Vac deck adapter
is removed. Do Not operate mower
unlessadapterordeectorisinplaceand
properly mounted.
FIGURE 23- FULL SIZE
1/4" DOWN
Keep cut-off as close to
the top edge as possible.
IMPORTANT:
1/2" FROM FRONT