


15
■ You may make adjustments and repairs described here.
For other repairs, have the trimmer serviced by an
authorised servicing dealer.
■ Consequences of improper maintenance may include
excess carbon deposits resulting in loss of performance
and discharge of black oily residue dripping from
the silencer.
■ Make sure all guards, straps, deflectors and handles are
properly and securely attached to avoid the risk of
personal injury.
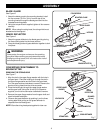
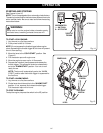
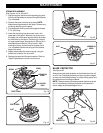
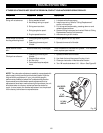
SPOOL REPLACEMENT
EZ LINE™ TAP ADVANCE SYSTEM
NEW PRE-WOUND SPOOL
See Figures 16 and 17.
If replacing string only, refer to “String Replacement” later in
this manual.
Use only 2.4 mm (0.095 in) diameter monofilament string.
Use the manufacturer’s replacement string for best perfor-
mance.
1. Stop the engine and disconnect the sparking plug wire.
Hold the string head and unscrew the spool retainer.
Turn clockwise.
2. Remove the empty spool from the string head. Keep the
spring attached to the spool.
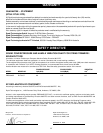
3. To install the new spool, make sure the two strings are
captured in the slots opposite each other on the new
spool. Make sure the ends of each string is extended
approximately 152 mm (6 in) beyond each slot.
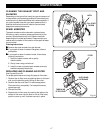
4. Thread the strings into the eyelets in the string head.
Carefully push the spool into the string head (gently pull
the strings to the outside if necessary). When the spool
is positioned in the string head, grasp the strings and
pull sharply to release them from the slots in the spool.
5. Push down and turn the spool anticlockwise until it no
longer turns. Hold the spool down and rotate clockwise a
small amount. Release the spool. The spool should be
locked down in the string head. If not, hold down and
rotate until locked.
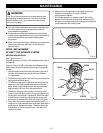
MAINTENANCE
WARNING:
Use only original manufacturer’s replacement parts,
accessories and attachments. Failure to do so can
cause possible injury, poor performance and may
void your warranty.
EYELETS
SPRING
SLOTS
STRING HEAD
SHAFT
Fig. 16
Fig. 17
EYELETS
SPOOL
RETAINER
SPOOL
6. Make sure the string head and the spool retainer are
installed on the shaft by turning the retainer
anticlockwise to tighten.
7. Pull the strings again to rotate the spool into cutting
position. Push the spool retainer down while pulling on
string(s) to manually advance the string and to check for
proper assembly of the string head.