


6 7
MAINTENANCE
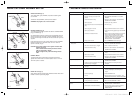
TO START MOWER
TO STOP MOWER
HINTS FOR EASY STARTING
WARNING: Before starting, learn how to stop the
engine quickly in any emergency.
ENGINE WITH AUTOMATIC CHOKE
1. Move throttle control to RUN.
2. Grasp starter handle and pull.
ENGINE WITH MANUAL CHOKE
1. Turn fuel tap ON. (Where fitted).
2. Move throttle control to CHOKE.
3. Grasp starter handle and pull.
4. After engine starts move throttle control to RUN.
1. Move throttle control to STOP.
2. Turn fuel tap OFF. (Where fitted).
1. Start a warm engine with the throttle control set at
RUN.
2. Start the mower on a level, gravel free path or
driveway. As the blades are unloaded, less effort is
required. When starting on grass move the mower to
an area previously cut.
3. Keep the underside of the mower base clean. Remove
any obstruction to the free movement of the cutting
assembly.
MAINTENANCE
Perform only that maintenance described in this manual
and engine instructions. For other adjustments or repairs
contact an Authorised Rover Mower Service Agent.
Briggs & Stratton Operating & Maintenance Instructions
are known as Engine Instructions here.
MAINTAIN ENGINE OIL LEVEL
CAUTION: A low oil level may result in engine
damage.
Check oil level each 5 hours of mowing. Maintain oil
level within safe region on dip stick.
CHANGE OIL
REFER ENGINE INSTRUCTIONS
Change oil after first 5 hours of mowing. Thereafter
change oil every 25 hours of mowing.
Dispose of waste oil thoughtfully.
WARNING: Tilt mower with fuel tank empty. Fuel may
spill from the fuel cap vent.
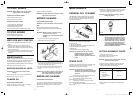
MOWER CLEANING
REFER ENGINE INSTRUCTIONS
WARNING:
To reduce fire hazard, keep the mower
clean.
For best mower performance keep the engine
underside of mower base and grass catcher screen
clean.
WARNING: Maintain engine oil cooling system.
Poor air flow may result in
overspeeding, overheating and engine
damage.
1. Use a brush or cloth to clean the engine of
accumulated dirt, grass and leaves.
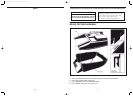
2. To clean the rear catcher mower base use a hose to
direct water through the wash port while the engine is
running at a moderate speed. (Fig. 7).
3. To clean the catcher, remove from the mower, empty
and hose out to release grass and dirt from the
screen.
CAUTION: Do not hose the engine. A forced spray of
water may contaminate the fuel system.
Poor engine performance may result.
ENGINE AIR CLEANER
REFER ENGINE INSTRUCTIONS
The engine air cleaner element must be serviced after
each 25 hours of normal mowing. The element must be
serviced more frequently when the mower is used in
dusty conditions.
SNORKEL AIR CLEANER
The SNORKEL air cleaner element must be cleaned
after each 50 hours of normal mowing. The element
must be cleaned more frequently when the mower is
used in dusty conditions.
1. Disconnect Air Tube from Cartridge holder.
2. Unscrew CAP.
3. Remove CARTRIDGE.
4. Tap cartridge gently on a flat surface to remove dirt.
5. Replace cartridge with hole down.
6. Replace cap.
7. Reconnect Air Tube to Cartridge holder.
CAUTION: Do not allow dirt into the AIR TUBE.
Engine damage may result. Check the
condition of the air tube regularly.
Replace the tube if squashed, cracked or
holed.
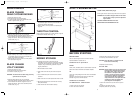
SPARK PLUG
For best engine performance check the condition of the
spark plug each 100 hours of mowing. A worn or
damaged spark plug must be replaced.
CAUTION: Do not sand blast or file spark plug
electrodes. Grit may release from the plug
and fall into the cylinder. Engine damage
may result.
1. Clean area around spark plug to ensure no dirt
enters the cylinder when plug is removed.
2. Using the tube spanner provided and an
adjustable wrench, remove plug.
3. If a new plug is required refer to the engine
manual for the correct spark plug.
4. Set gap between electrodes at 0.7mm to 0.8mm.
See (Fig. 9).
5. Install plug in engine and tighten to 20 Nm. If a torque
wrench is not available hand tighten plug. Then with
tube spanner tighten plug about 1/12 of 1 turn.
CAUTION: Do not overtighten spark plug. Engine
damage may result.
WARNING: Always disconnect the spark plug wire
before working on the mower to prevent
accidental starting. Before using, always
visually inspect the mower to check that
blades, blade bolts and cutter assembly
are not worn or damaged. Replace worn
or damaged blades in sets to preserve
balance. DAMAGED BLADES AND WORN
BOLTS ARE MAJOR HAZARDS.
CUTTING ASSEMBLY CHECK
1. Disconnect spark plug wire.
2. Set mower at high cut and fold handle.
3. Tilt mower so spark plug is up.
WARNING: Tilt mower with fuel tank empty. Fuel may
spill from the fuel cap vent.
4. Inspect the cutting assembly for damage and wear.
5. Check security of disc retaining bolts. If required,
tighten in accordance with table below.
6. Return mower to normal position and replace spark
plug wire.
Description
l
Torque
One large centre bolt
9/16” AF
Three small
concentric bolts
1/2” AF
65-70 Nm
16-19 Nm
o
l
o o
l
o
ll
3259 Domestic Rotary 18/5/06 1:52 PM Page 6