


UTILITY MOWER SET-UP
BEFORE STARTING
MAINTENANCE
BLADE CHANGE
REAR CATCHER MOWER
BLADE CHANGE
UTILITY MOWER
THROTTLE CONTROL
MOWER STORAGE
8 5
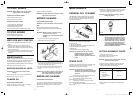
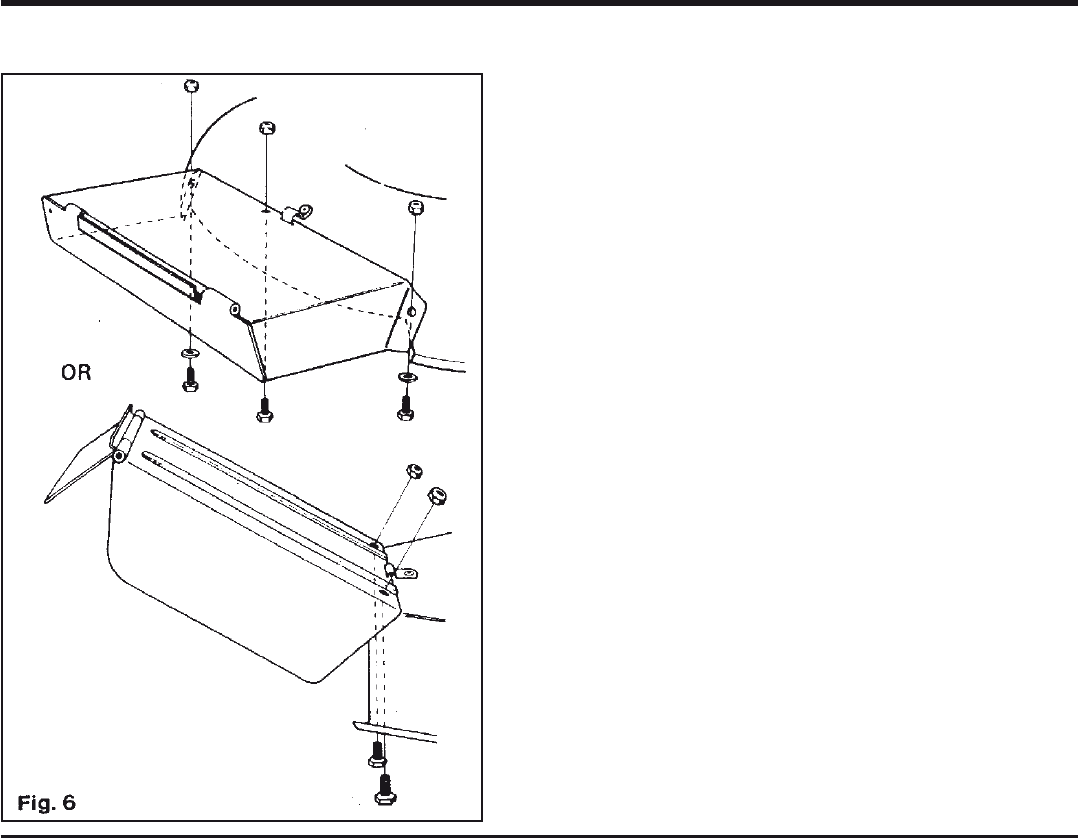
GRASS CHUTE (Where fitted) (Fig. 6)
Fix the grass chute in place using screws and nuts supplied.
WARNING: Do not remove the grass chute or use mower
with the chute of flap up. Thrown objects are
major hazards.
FOLDING HANDLE AND HEIGHT OF CUT
REFER REAR CATCHER MOWER SET-UP
PREPARE ENGINE
The four stroke engine used on the mower requires
separate additions of petrol and oil.
CAUTION: Do not mix petrol with oil.
PETROL
Clean, fresh, unleaded petrol is recommended. Lead free
petrol burns cleaner with fewer combustion deposits
OIL
Use a high quality detergent oil with service classification
SE or SF.
Detergent oils keep the engine clean and retard the
formation of gum and varnish deposits
CAUTION: Use no oil additives.
FILL SUMP WITH OIL - CAPACITY 600mL
1. Place mower on level ground.
2. Clean area around OIL-FILL.
3. Remove DIP STICK and check oil level.
4. Fill sump to FULL MARK on dip stick.
CAUTION: Screw dip stick in to obtain actual oil
level. Do not overfill sump.
5. Replace dip stick securely.
FILL FUEL TANK
WARNING: Refuel outdoors only. Do not smoke while
fuelling engine. Add fuel before starting
the engine. Never remove the cap from
the fuel tank or add petrol while the
engine is running or when the engine is
hot. If petrol is spilled do not attempt to
start the engine but move machinery
away from the area of the spill and avoid
creating any source of ignition until
petrol vapours have dissipated.
1. Clean area around fuel cap and remove cap from
tank.
2. Fill tank to just below filler neck.
3. Replace petrol tank cap securely.
1. Disconnect spark plug wire
2. Set mower at high cut and fold handle.
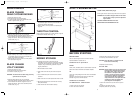
3. To access blades lift FLAP and PROP with broom
handle or garden stake. (Fig. 10)
4. Remove blade retaining bolt, nut and washer
assemblies. Retain D PLATES. Discard all other parts.
5. Fit new blades and fasteners together in sets for
safety and balance. Take care to assemble parts in
correct order. (Fig. 11)
6. Tighten retaining nuts to 16Nm. If a torque wrench is
not available, tighten nuts firmly. Ensure blade can
swivel using medium hand effort.
7. Remove flap prop, return mower to normal position
and replace spark plug wire.
1. Disconnect spark plug wire.
2. Set mower at high cut and fold handle.
3. Tilt mower so spark plug is up.
4. Remove blade retaining bolt, nut and washer
assemblies. Retain D PLATES. Discard all other parts.
5. Fit new blades and fasteners together in sets for
safety and balance. Take care to assemble parts in
correct order. (Fig. 12).
6. Tighten retaining nuts to 16 Nm. If a torque wrench is
not available, tighten nuts firmly. Ensure blade can
swivel using medium hand effort.
7. Return mower to normal position and replace spark
plug wire.
Each 25 hours of mowing use a small amount of light oil
to lubricate the throttle control. (Fig. 13).
For storage all fuel must be removed from the
carburettor, fuel line and tank to prevent the formation
of gum-like varnish deposits. Such deposits, if allowed
to appear, may cause starting problems and poor
engine performance.
1. Move throttle control to STOP.
2. Clean area around fuel cap and remove cap from
tank.
3. Use a mechanical siphon to drain fuel into a clean
container.
4. Start mower and run at idle speed until all fuel is used.
5. Move the throttle control to STOP and turn fuel tap
OFF. (Where fitted).
6. Clean mower and check fastener security.
WARNING: Tilt mower with fuel tank empty. Fuel may
spill from the fuel cap vent.
3259 Domestic Rotary 18/5/06 1:52 PM Page 5