


Rover Mowers Limited Model 45 Rover Mowers Limited Model 45
ASSEMBLY
MAINTENANCE
TMTM TMTM
1.1 UNPACKING
1. Lift the top off the carton base and place to one
side.
2. Pivot the upper handlebars into the upright
position, and secure with the clamp screw and
nut. Do not damage the clutch and throttle cables.
Refer to separate sheet for details.
3. Roll the mower off the timber base of the
carton.
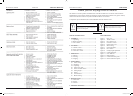
4. To adjust the height of the handlebars:-
a.Loosenthelowerhandlebarsecuringbolts(A)
on both sides of the mower. Figure 1.
b. Adjust the height of the handle bars, by pivoting
them up or down, to suit the operator.
c.Re-tightenthenuts(A)Figure1.
1.2 BEFORE OPERATING
1. Place the mower on a level surface in a well
ventilated area.
2. Fill the engine crankcase with 10W-30 or SAE 30
oiltothetopoftheoilllerport.Refertoengine
manufacturers instructions.
3. Fill the fuel tank with UNLEADED petrol.
4. Ensure the spark plug lead is connected to the
spark plug.
1.3 GRASS CATCHER
1. Totthecatcher. Hold the grass catcher by the
top edge, hook the catcher on to the two locating
pegs on the front of the mower, positioning the
catcher on the two rubber stops on either side of
the mower.
2. To remove the catcher. Disengage the cutter
drive and move the throttle control lever to stop
position. When the engine has stopped, hold the
catcher by the top edge and lift it off the locating
pegs.
Figure 1. Rear View
WARNING
StoptheengineBEFOREttingor
removing the grass catcher.
WARNING
Read and understand the safety
in str ucti ons a nd th e engi ne
manufactuers operating instructions
BEFORE using the mower.
1
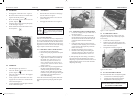
5.1 LUBRICATION
To gain the optimum performance from your
mower, the following areas need to be oiled every
vehoursofoperation.Thesamegradeoilasused
in the engine is suitable.
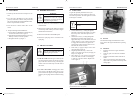
1. ClutchThrustPad(1)-lookingthroughthe
left hand oil port hole in the clutch cover apply
three drops of oil in the thrust pad oil hole.
Figure 13.
2. Clutchinnercone(2)-lookingthroughthe
right hand oil port hole in the clutch cover
apply three drops of oil in the clutch inner cone
oil hole. Figure 13. Note: in may be necessary
to engage the clutch and slowly pull on the
engine starter cord to align the inner cone oil
hole with the clutch cover hole.
3. Frontroller(3)-applysixdropsofoiltoeach
side of the shaft. Figure 14.
4. Heightadjustmentknob(4)-removethe
plastic cover plug to gain access, and apply six
drops of oil. Figure 14.
5. Drivechains(5)-every10hoursofoperation
remove the chain case side cover and apply
a ‘chain oil’ to the drive chains. Replace side
cover. Figure 14.
Figure 14. Lubrication points
5.2 ENGINE
For detailed cleaning and maintenance instruc-
tions, refer to the engine manufacturers operating
manual.
5.3 GENERAL
1. Keep the mower free of grass and debris
build up.
2. Clean any spilt oil or fuel from around the
engine.
3. Regularly check that all nuts and bolts are
secure.
4. After use and cleaning, lubricate the blade
edges with oil to prevent rust build up on the
cutting edges.
CAUTION
Bearings are sealed for life and do not require
lubrication.
NOTES
6
Figure 13. Clutch lubrication points. Clutch thrust
pad and clutch inner cone points.
2892 Reel Mower IMPOSED.indd 4 9/11/2005 9:12:49 AM