


23
4
TO CHECK THE MOWER FOR ALIGNMENT – Your mower is designed to produce the perfectly flat cut that is required
for a top quality green. Ridging or stepping between cuts means that the height of cut is unevenly set or more likely,
that the mower is “out of square” – That is, the rear roller is not perfectly in line with the cutting edge of the bottom
blade. This condition can be brought about by transport of the mower or undue stress caused by bumping while moving
from the equipment shed onto the green. Re-alignment can be achieved by different means but the recommended
procedure is –
Lay the mower back on the handle.
Chalk the thin front edge of the bottom blade about 6” of is length at both ends.
With the front roller remaining in approximately its normal height setting, “sight” the bottom of the front roller relative to
the chalked cutting edge of the blade.
Adjust the front roller into exact alignment with the cutting edge, continually sighting while adjustment proceeds.
Lock the roller and recheck.
Now use your height setting bar as an aligning tool by placing the bar against the front roller and the rear roller on the
extreme LEFT HAND SIDE. (Chain Cover Side)
Adjust the setting bar screw so that it just contacts the bottom blade cutting edge.
Test the right hand side of the rollers with the same setting, and adjust the rear roller up or down until the same screw
contact is achieved on the blade.
As the movement of the rear drum could affect the original L.H.S. setting slightly, reset the screw at the L.H.S. and
recheck the R.H.S.
All elements of your machine will not be in perfect alignment.
After tightening all adjustments a final check should be made.
The required height of cut can now be checked and set in the normal manner.
While the procedure may seem complicated it is in fact very simple to perform and can be carried out in less than 15
minutes. The sighting is easy and accurate because it is done from the front roller which is nearest to the operator. A
machine that is “true” will pay dividends by precision cutting of your green.
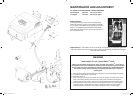
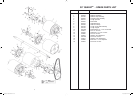
CUTTER – To adjust the cutter setting, slacken cutter hanger clamp
bolts (4) at each side of the machine, and proceed as follows:
Adjustment – Slacken the top nuts (5) on adjusting screws. Then
by tightening the bottom nuts (6), the cutter is lowered on to the
bottom blade. To raise the cutter, loosen the bottom nuts and tighten
the top nuts. Re-tighten cutter hanger clamp bolt nuts. Always adjust
cutter to bear very lightly on bottom blade. If the cutter rubs harshly
on the bottom blade, there will be excessive wear of both cutter
blades and bottom blade, and an unnecessarily heavy load on the
power unit.
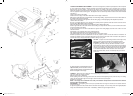
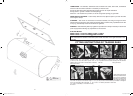
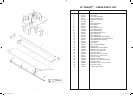
A grass trough is incorporated that can be
adjusted closely to the rear drum so that
grass and dirt build-up is scraped from the
drum and caught in the trough.
TO EMPTY – Remove the cover plate from the trough opening in the side frame.
The cover unclips by pivotting it upward.
Withdraw the trough, as illustrated.
When replacing, the end of the trough could come into contact with its adjusting screw, when half way in. A twisting
action will allow the bottom edge of the trough to clear the screw and to push right in.
Replace the cover plate.
NOTE – The trough can be withdrawn more easily if the deflector clamp bolts are loosened and the deflector
lowered to allow extra clearance.
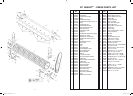
ADJUSTMENT – The adjusting screw can only be operated when the trough is removed as it is located under the
centre of the trough.
To adjust trough closer to roller, release lock-nut and lower screw slightly – to move it away, raise screw slightly. Replace
trough and check clearance from the drum. If satisfactory withdraw trough and tighten lock-nut.
3676 Queen 30 Reel Mower.indd 5 22/11/2005 4:27:34 PM