


7
103148
OWNER’S MANUAL
REPLACING SAW CHAIN
Replace chain when cutters are too worn to sharpen or
when chain breaks. Only use replacement chain noted
in this manual. Always include new drive sprocket
when replacing chain. This will maintain proper driv-
ing of chain.
RECYCLING
In the event it is not practical to repair your chain saw, be
sure to follow local and country codes for recycling
plastic and metallic materials when disposing of the unit.
CLEANING SAW BODY
Keep saw body clean. Use a soft cloth dampened with
a mild soap and water mixture. Wipe saw body to clean.
When cleaning saw body,
• do not submerge saw in any liquids
• do not use products that contain ammonia,
chlorine, or abrasives
• do not use chlorinated cleaning solvents, carbon
tetrachloride, kerosene, or gasoline
CARE OF GUIDE BAR
Uneven bar wear causes most guide bar problems.
Incorrect sharpening of chain cutter and depth gauge
settings often cause this. When bar wears unevenly, it
widens guide bar groove. This causes chain clatter and
rivet popping. Saw will not cut straight. Replace guide
bar if this occurs.
Inspect guide bar before sharpening chain. A worn or
damaged guide bar is unsafe. A worn or damaged guide
bar will damage chain. It will also make cutting harder.
Normal Guide Bar Maintenance
1. Remove guide bar from chain saw.
2. Remove sawdust from guide bar groove
periodically. Use putty knife or wire.
3. Clean oil slots after each day of use.
4. Remove burrs from sides of guide bar. Use flat file
to make side edges square.
Replace guide bar when
• bar is bent or cracked
• inside groove of bar is badly worn
CLEANING AND
MAINTENANCE
NOTICE: Below are instructions for servicing
your chain saw. Any servicing not mentioned
below should be done by an authorized service
center.
SHARPENING YOUR SAW CHAIN
!
WARNINGICON G001
WARNING: Unplug chain saw from power
source before servicing. Severe injury or death
could occur from electrical shock or body
contact with moving chain.
STORAGE
If storing saw for more than 30 days, follow steps
below.
1. Drain oil tank.
2. Remove and clean guide bar and chain. Clean guide
bar and chain by soaking in petroleum based
solvent or mild soap and water mixture.
3. Dry guide bar and chain.
4. Place chain in container filled with oil. This will
prevent rust.
5. Wipe a thin coating of oil over surface of guide
bar.
6. Wipe off outside of saw body. Do this with soft
cloth dampened with a mild soap and water
mixture.
7. Store chain saw in a high or locked place that is
dry and out of children’s reach.
REPLACEMENT
PARTS
!
WARNINGICON G001
WARNING: Use only replacement parts
described in this manual. Use of other parts
could damage saw or injure operator.
Purchase these parts from your local dealer.
Part Number Description
097572-03S Guide bar, 400 mm
097570-01S Guide bar, 350 mm
091375-02S Chain, 400 mm
091374-02S Chain, 350 mm
107713-01 Drive sprocket
!
WARNINGICON G 001
WARNING: Cutting edges on chain are
sharp. Use protective gloves when handling
chain.
Keep chain sharp. Your saw will cut faster and more
safely. A dull chain will cause undue sprocket, guide
bar, chain, and motor wear. If you must force chain into
wood and cutting creates only sawdust with few large
chips, chain is dull.
Items Needed to Sharpen Chain
Purchase these items from your local dealer, hardware
store, or chain saw supplies outlet.
•4 mm round file • Depth gauge tool
• File guide • Vise
• Medium sized flat file
Sharpening Cutters
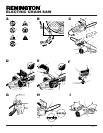
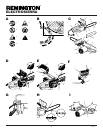
Use file guide for 30° filing.
1. Adjust chain for proper tension (see Saw Chain
Tension Adjustment).
2. Clamp guide bar in vise to hold saw steady.
Note:
Do not clamp chain.
3. Press four millimeter round file (attached to file
guide) into groove between top plate and depth
gauge on chain. File guide should rest on both top
plate and depth gauge (see Figures R and S).
Note:
File at midpoint of guide bar.
4. Hold file guide level. Make sure 30° mark on file
guide is parallel to center of guide bar (see Figure
R). This will insure that you file cutters at 30° angle.
5. File from inside towards outside of cutter until
sharp. Only file in this one direction (see Figure
R).
Note:
Two or three strokes with file should
sharpen cutter.
6. After each cutter if sharpened, move chain forward
to sharpen next cutter. File all cutters on one side
of chain.
7. Move to other side of chain and repeat process.
Call Outs For Figure R
1. Filing Direction
2. 30° Guide Mark
3. File Guide
4. 4 mm Round File
5.
Note:
This illustration shows file guide placement
and filing direction for sharpening cutters on left
side of chain.
Call Outs For Figure S
1. Left Side of Chain
2. Groove
3. Top Plate (right side of chain)
4. Depth Gauge (left side of chain)
5. Top Plate (left side of chain)
6. Depth Gauge (right side of chain)
7. Right Side of Chain
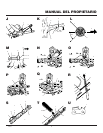
Filing Cutter Depth Gauges
The cutter depth gauge clearance is reduced as cutters
are sharpened. After every second or third sharpening,
reset cutter depth gauges.
1. Place depth gauge tool firmly across top of two
cutters. Make sure depth gauge enters slot in depth
gauge tool (see Figure T).
2. Use medium flat file. File depth gauge level with
depth gauge tool.
3. Remove depth gauge tool. With flat file, round off
front corner of cutter depth gauge (see Figure U).
Call Outs For Figure T
1. Depth Gauge
2. Flat File
3. Depth Gauge Tool
4. Depth Gauge Slot
Call Outs For Figure U
1. Front Corner
After several hand filings, have authorized service
center or sharpening service machine sharpen chain.
This will insure even filing.
Log Supported On Both Ends
1. Make first cut from above log (see Figure Q). Cut
1/3 through diameter of log. This cut will keep
section from splintering when cut.
2. Make second cut on underside of log, directly under
first cut. Use top of guide bar to make this cut. Cut
up to meet first cut. This will keep log from pinching
guide bar and chain.
Call Outs For Figure Q
1. 1st Cut
2. 2nd Cut