


5
103148
OWNER’S MANUAL
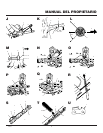
SAW CHAIN TENSION
ADJUSTMENT
!
WARNINGICON G001
WARNING: Maintain proper chain tension
always. A loose chain will increase the risk of
kickback. A loose chain may jump out of guide
bar groove. This may injure operator and
damage chain. A loose chain will cause chain,
guide bar, and sprocket to wear rapidly.
Note:
For pre assembled models, the saw chain tension
is properly set at factory. A new chain will stretch.
Check new chain after first few minutes of operation.
Allow chain to cool down. Follow steps below to
readjust saw chain tension.
1. Before adjusting chain, make sure guide bar nuts
are only finger tight (see Figure D and E). Also
make sure adjusting block is in oval adjusting hole
on guide bar (see Figures D, E, and F).
2. Turn adjusting screw clockwise until all slack is
out of chain (see Figure G).
Note:
There should be
no gap between side links of chain and bottom of
guide bar (see Figure H).
3. Wearing protective gloves, move chain around
guide bar. Chain should move freely. If chain does
not move freely, loosen chain by turning adjusting
screw counterclockwise.
4. After chain tension is correct, tighten guide bar nuts
firmly. If not, guide bar will move and loosen chain
tension. This will increase the risk of kickback. This
can also damage saw.
Note:
A new chain will stretch.
Check new chain after first few minutes of operation.
Allow chain to cool down. Readjust chain tension.
Call Outs For Figure H
1. Guide Bar Nuts 3. Incorrect Tension
2. Gap 4. Correct Tension
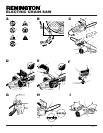
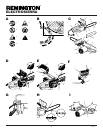
FOR MODELS EL-3, EL-7, AND EL-2
ONLY
1. Lay saw chain out flat.
2. Remove guide bar nuts, guide bar bolts, and Phillips
screw from plastic bag.
3. Install hand guard by pressing two bosses (at bottom
of hand guard) into hex-shaped holes in saw body
(see Figure E). Install Phillips screw into hand guard
and saw handle. Tighten screw firmly.
4. Turn adjusting screw counterclockwise (see Figure
F). Continue to turn adjusting screw until adjusting
block is to rear of adjusting plate.
5. Install guide bar onto saw body. Slide guide bar onto
adjusting plate.
IMPORTANT:
Make sure to insert
adjusting block into oval adjusting hole on guide bar.
6. Rotate sprocket support up over guide bar. Align
holes in sprocket support with guide bar bolt holes
in saw body.
7. Insert front guide bar bolt through saw body and
sprocket support (see Figure E.). Install and tighten
guide bar nut finger-tight only.
8. Place chain around drive sprocket, then along top
groove of guide bar and around guide bar nose.
Continued
Note:
Make sure cutting edges of chain are facing
the right direction. Position chain so cutting edges
on top of guide bar face guide bar nose (see Figure E).
!
WARNINGICON G001
CAUTION: Do not place chain on saw
backwards. If chain is backwards, saw will
vibrate badly and will not cut.
9. Insert rear guide bar bolt through saw body and
sprocket support. Install and tighten guide bar nut
finger-tight only.
IMPORTANT:
Make sure adjusting
block is in oval adjusting hole on guide bar.
10.Adjust saw chain tension. Follow steps under Saw
Chain Tension Adjustment.
Call Outs For Figure E
A. Towards Guide Bar Nose
A1. Cutting Edge
1. Phillips Screw
2. Hand Guard
3. Guide Bar Bolts
4. Bosses
5. Saw Chain
6. Guide Bar
7. Adjusting Hole
8. Guide Bar Nuts
9. Sprocket Support
10. Drive Sprocket
FILLING OIL TANK
1. Remove oil cap.
2. Fill oil tank with SAE #30 motor oil. Grain-based
biodegradable bar and chain lubricants made from
rapeseed oil, canola oil, or sunflower oil bases also
provide acceptable performance.
Note:
For
temperatures below -1°C, use SAE #10 oil. For
temperatures above 24°C, use SAE #40 oil.
3. Replace oil cap at once. Tighten oil cap firmly for
good seal. This will avoid oil seepage from tank.
4. Wipe off excess oil.
Note:
It is normal for oil to seep when saw is not in use.
Empty oil tank after each use to prevent seepage.
OPERATING CHAIN
SAW
EXTENSION CORDS
Use proper extension cord with this chain saw. Use a
HO7RN extension cord with no less than 1.5 mm
2
wire
at distances up to 30 meters. Use a ground fault circuit
interrupter as part of the power supply system.
Use an extension cord heavy enough to carry the
current your saw will draw. An undersized cord will
cause a voltage drop at the saw, loss of power, and
overheating.
Keep cord away from cutting area. Make sure cord
does not catch on branches or logs during cutting.
Inspect cords often. Replace damaged cords.
OILING SAW CHAIN
Always check oil level before using saw. To oil chain,
press squeeze bulb on oil cap. Do not attempt to operate
the oiler while cutting with the saw. Oil will feed onto
guide bar and chain. Press squeeze bulb on oil cap at least
once before each cut. Check oil level often by looking at
oil sight level hole. Oil sight level hole is on left side of
saw, between front handle and front hand guard.
3. Turn adjusting screw counterclockwise (see Figure
F). Continue to turn adjusting screw until adjusting
block is to rear of adjusting plate.
4. Install guide bar onto saw body. Place rear of guide
bar between adjusting plate and sprocket support.
IMPORTANT:
Make sure to insert adjusting block
into oval adjusting hole on guide bar.
5. Attach guide bar nuts to guide bar bolts.
IMPORTANT:
Tighten guide bar nuts finger tight only. Make sure
adjusting block is in oval adjusting hole on guide bar.
6. Place chain around drive sprocket, then along top
groove of guide bar and around guide bar nose.
Note:
Make sure cutting edges of chain are facing
the right direction. Position chain so cutting edges
on top of guide bar face guide bar nose (see Figure D).
!
WARNINGICON G001
CAUTION: Do not place chain on saw
backwards. If chain is backwards, saw will
vibrate badly and will not cut.
7. Adjust saw chain tension. Follow steps under Saw
Chain Tension Adjustment.
8. If saw has 2-piece side cover, attach sprocket cover.
Call Outs For Figure D
A. Towards Guide Bar Nose
A1. Cutting Edge
1. Saw Chain
2. Guide Bar
3. Adjusting Hole
4. Guide Bar Nuts
5. Guide Bar Bolts
6. Sprocket Support
7. Drive Sprocket
Call Outs For Figure F
1. Adjusting Block
2. Sprocket Support
3. Adjusting Plate
4. Adjusting Screw
ASSEMBLY
Continued
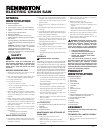
CUTTING WITH THE CHAIN SAW
1. Connect saw to power supply.
2. Make sure area of log to be cut is not touching
ground. This will keep chain from touching ground
as it cuts through log. Touching ground with moving
chain will dull chain.
3. Firmly grip saw as shown in Figure I. Thumbs and
fingers must wrap around saw handles.
4. Make sure your footing is firm. Keep feet apart.
Divide your weight evenly on both feet. Stand
slightly to left side of saw. This keeps your body
from being in direct line with chain.
5. When ready to make a cut, press in switch lockout
with right thumb and squeeze trigger (see Figure
I). This will turn saw on. Releasing trigger will turn
saw off. Make sure saw is running at full speed
before starting a cut.
6. When starting a cut, place moving chain against
wood. Hold saw firmly in place to avoid possible
bouncing or skating (sideways movement) of saw.
7. Guide saw using light pressure. Do not force saw.
Overload can cause motor burn out.