


6
103148
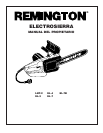
®
ELECTRIC CHAIN SAW
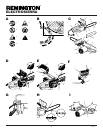
TRIMMING A TREE (Pruning)
Trimming a tree is the process of cutting limbs from a
living tree. Follow directions below to trim a tree.
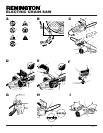
1. Make first cut 15 cm from tree trunk on underside
of limb. Use top of guide bar to make this cut. Cut
1/3 through diameter of limb (see Figure K).
2. Move 5 to 10 cm farther out on limb. Make second
cut from above limb. Continue cut until you cut
limb off.
3. Make third cut as close to tree trunk as possible on
underside of limb stub. Use top of guide bar to make
this cut. Cut 1/3 through diameter of stub.
4. Make fourth cut directly above third cut. Cut down
to meet third cut. This will remove limb stub.
Call Outs For Figure K
1. 1st Cut - Pruning Undercut (to avoid
splintering)
2. 2nd Cut - Pruning Cut (to avoid pinching)
3. 3rd Cut - Stub Undercut (to avoid splintering)
4. 4th Cut - Final Stub Cut
Felling is the process of cutting down a tree. Follow
directions below to fell a tree.
Before Felling a Tree
1. Inspect tree. Make sure there are no dead limbs or
branches that may fall on you. Study natural lean
of tree, location of larger branches, and wind
direction. This will help you judge which way tree
will fall.
2. Clear work area around tree.
3. Plan and clear a retreat path before felling. Make
retreat path opposite to planned direction of fall of
tree and at 45° angle (see Figure L).
4. Remove dirt, stones, loose bark, nails, staples, and
wire from tree where you will make felling cuts.
5. Stay on uphill side when felling tree. Tree could
roll or slide downhill after falling.
Call Outs For Figure L
1. Retreat Path
2. Direction of Fall
3. Tree
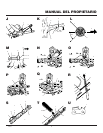
Felling Procedure
A) Felling Notch
A properly placed felling notch will determine direc-
tion tree will fall. Place felling notch on side of tree in
direction you want tree to fall (see Figure M). Follow
directions below to create a felling notch.
1. Make lower notch cut as close to ground as possible.
Hold saw so guide bar is horizontal. Cut 1/3 the
diameter of tree trunk (see Figure M).
Note:
Always
make this horizontal lower notch cut first. If you make
this cut second, tree can pinch chain or guide bar.
2. Start upper notch cut the same distance above first
cut as first cut is deep.
Example:
If lower notch
cut is 20 cm deep, start upper notch cut 20 cm above
it. Cut downward at 45° angle. The upper notch
cut
should meet end of lower notch cut (see Figure M).
3. Remove tree trunk wedge created by notching cuts.
B) Felling Cut
1. Make felling cut 5 cm higher than lower notch cut
and on opposite side of tree (see Figure M). Keep
felling cut parallel to lower notch cut.
2. Cut towards notch.
!
WARNINGICON G001
WARNING: Do not cut all the way through
tree. Leave about 5 cm of tree diameter uncut
directly behind felling notch (see Figure M).
This uncut portion acts as a hinge. The hinge
helps keep tree from twisting and falling in
wrong direction.
!
WARNINGICON G001
WARNING: Do not fell a tree without ample
skill or expert help. Be aware of your
surroundings. Do not endanger any person,
strike utility lines, or cause property damage.
If tree strikes utility lines, contact utility
company at once.
FELLING A TREE
(Cutting Down a Tree)
BUCKING A LOG
!
WARNINGICON G001
WARNING:
• If on slope, make sure log will not roll
down hill. Secure log by using wooden
stakes. Stand on uphill side of log while
cutting.
• While cutting log, never hold log with
your hand, leg, or foot or allow another
person to hold log.
Bucking a log is cutting a log into sections. When
possible, raise log or section off ground. Do this by
using limbs, logs, chocks, etc.
When cutting through log, maintain control by reduc-
ing cutting pressure near end of cut.
Follow directions below to buck a log.
Entire Length Of Log On Ground
1. Cut log from top (see Figure O).
Log Supported On One End
1. Make first cut on underside of log (see Figure P).
Use top of guide bar to make this cut. Cut 1/3
through diameter of log. This cut will keep section
from splintering when cut.
2. Make second cut directly above first cut. Cut down
to meet first cut. This cut will keep log from
pinching guide bar and chain.
Call Outs For Figure P
1. 1st Cut
2. 2nd Cut
LIMBING A TREE
Limbing is removing branches from a fallen tree. Do
not remove larger limbs under tree that support log off
ground. Remove each limb with one cut (see Figure N).
Clear cut limbs from work area often. This will help
maintain a safe work area.
Make sure you start your cut where limb will not pinch
saw during cutting. To avoid pinching, start cut on
freely hanging limbs from above limb. Start cut on
limbs under tension from under limb. If pinch occurs,
turn saw off, lift limb, and remove saw.
3. As felling cut nears hinge, tree should begin to fall.
Note:
If needed, drive wedges into felling cut to
control direction of fall. If tree settles back and
pinches chain, drive wedges into felling cut to
remove saw. Only use wedges made of wood, plastic,
or aluminum. Never use wedge made of steel. This
could cause kickback and damage to chain.
4. When tree begins to fall, quickly
•remove saw from felling cut
•release trigger and put saw down
•exit area using retreat path
Call Outs For Figure M
1. 1st Cut - Lower Notch Cut
2. 2nd Cut - Upper Notch Cut
3. 3rd Cut - Felling Cut
4. Hinge
5. Direction of Fall
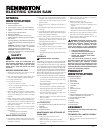
CHAIN BRAKE
(Models EL-4 and EL-7B only)
The chain brake quickly stops the saw chain. Kickback
causes the back of operator’s left hand to contact front
hand guard (see Figure J). When front hand guard
moves forward, the saw chain stops. This reduces the
chance of serious injury during kickback. When the
chain brake activates, release trigger at once.
To reset chain brake, release trigger and move front
hand guard back into position. You must release trigger
first. If not, the saw will start when you reset the front
hand guard.
!
WARNINGICON G001
CAUTION: Do not use the chain brake to
stop and start your saw. Quick repeated stops
may cause overheating of the chain brake.
Damage to the chain brake will occur.
Note:
Test chain brake before each use. Firmly grip
saw with both hands. With saw running, move front
hand guard forward with back of left hand. Keep both
hands on the handles. Saw chain should stop. If chain
brake does not work, have saw repaired by authorized
service person.
Call Outs For Figure J
1. Activation of Chain Brake
2. STOP
8. Remove saw from a cut with saw running at full
speed. Stop saw by releasing trigger. Make sure
chain has stopped before setting saw down.
9. Practice until you can maintain a steady, even
cutting rate.
Call Outs For Figure I
1. Switch Lockout
2. Trigger
OPERATING CHAIN
SAW
Continued